
Updated for Version 7.0

Yumemizuki Mizuki is a 5★ Anemo Catalyst character in Genshin Impact whose playstyle centers around dealing Stellar Swirl (SSW) damage from on-field. Learn about Mizuki’s best builds, best weapons, best artifacts, and best teams in this quick guide.
Note that the information given may change if new discoveries are made. More extensive testing is in progress.
Join our Discord to participate in the theorycrafting process.
Table of Contents
Infographic
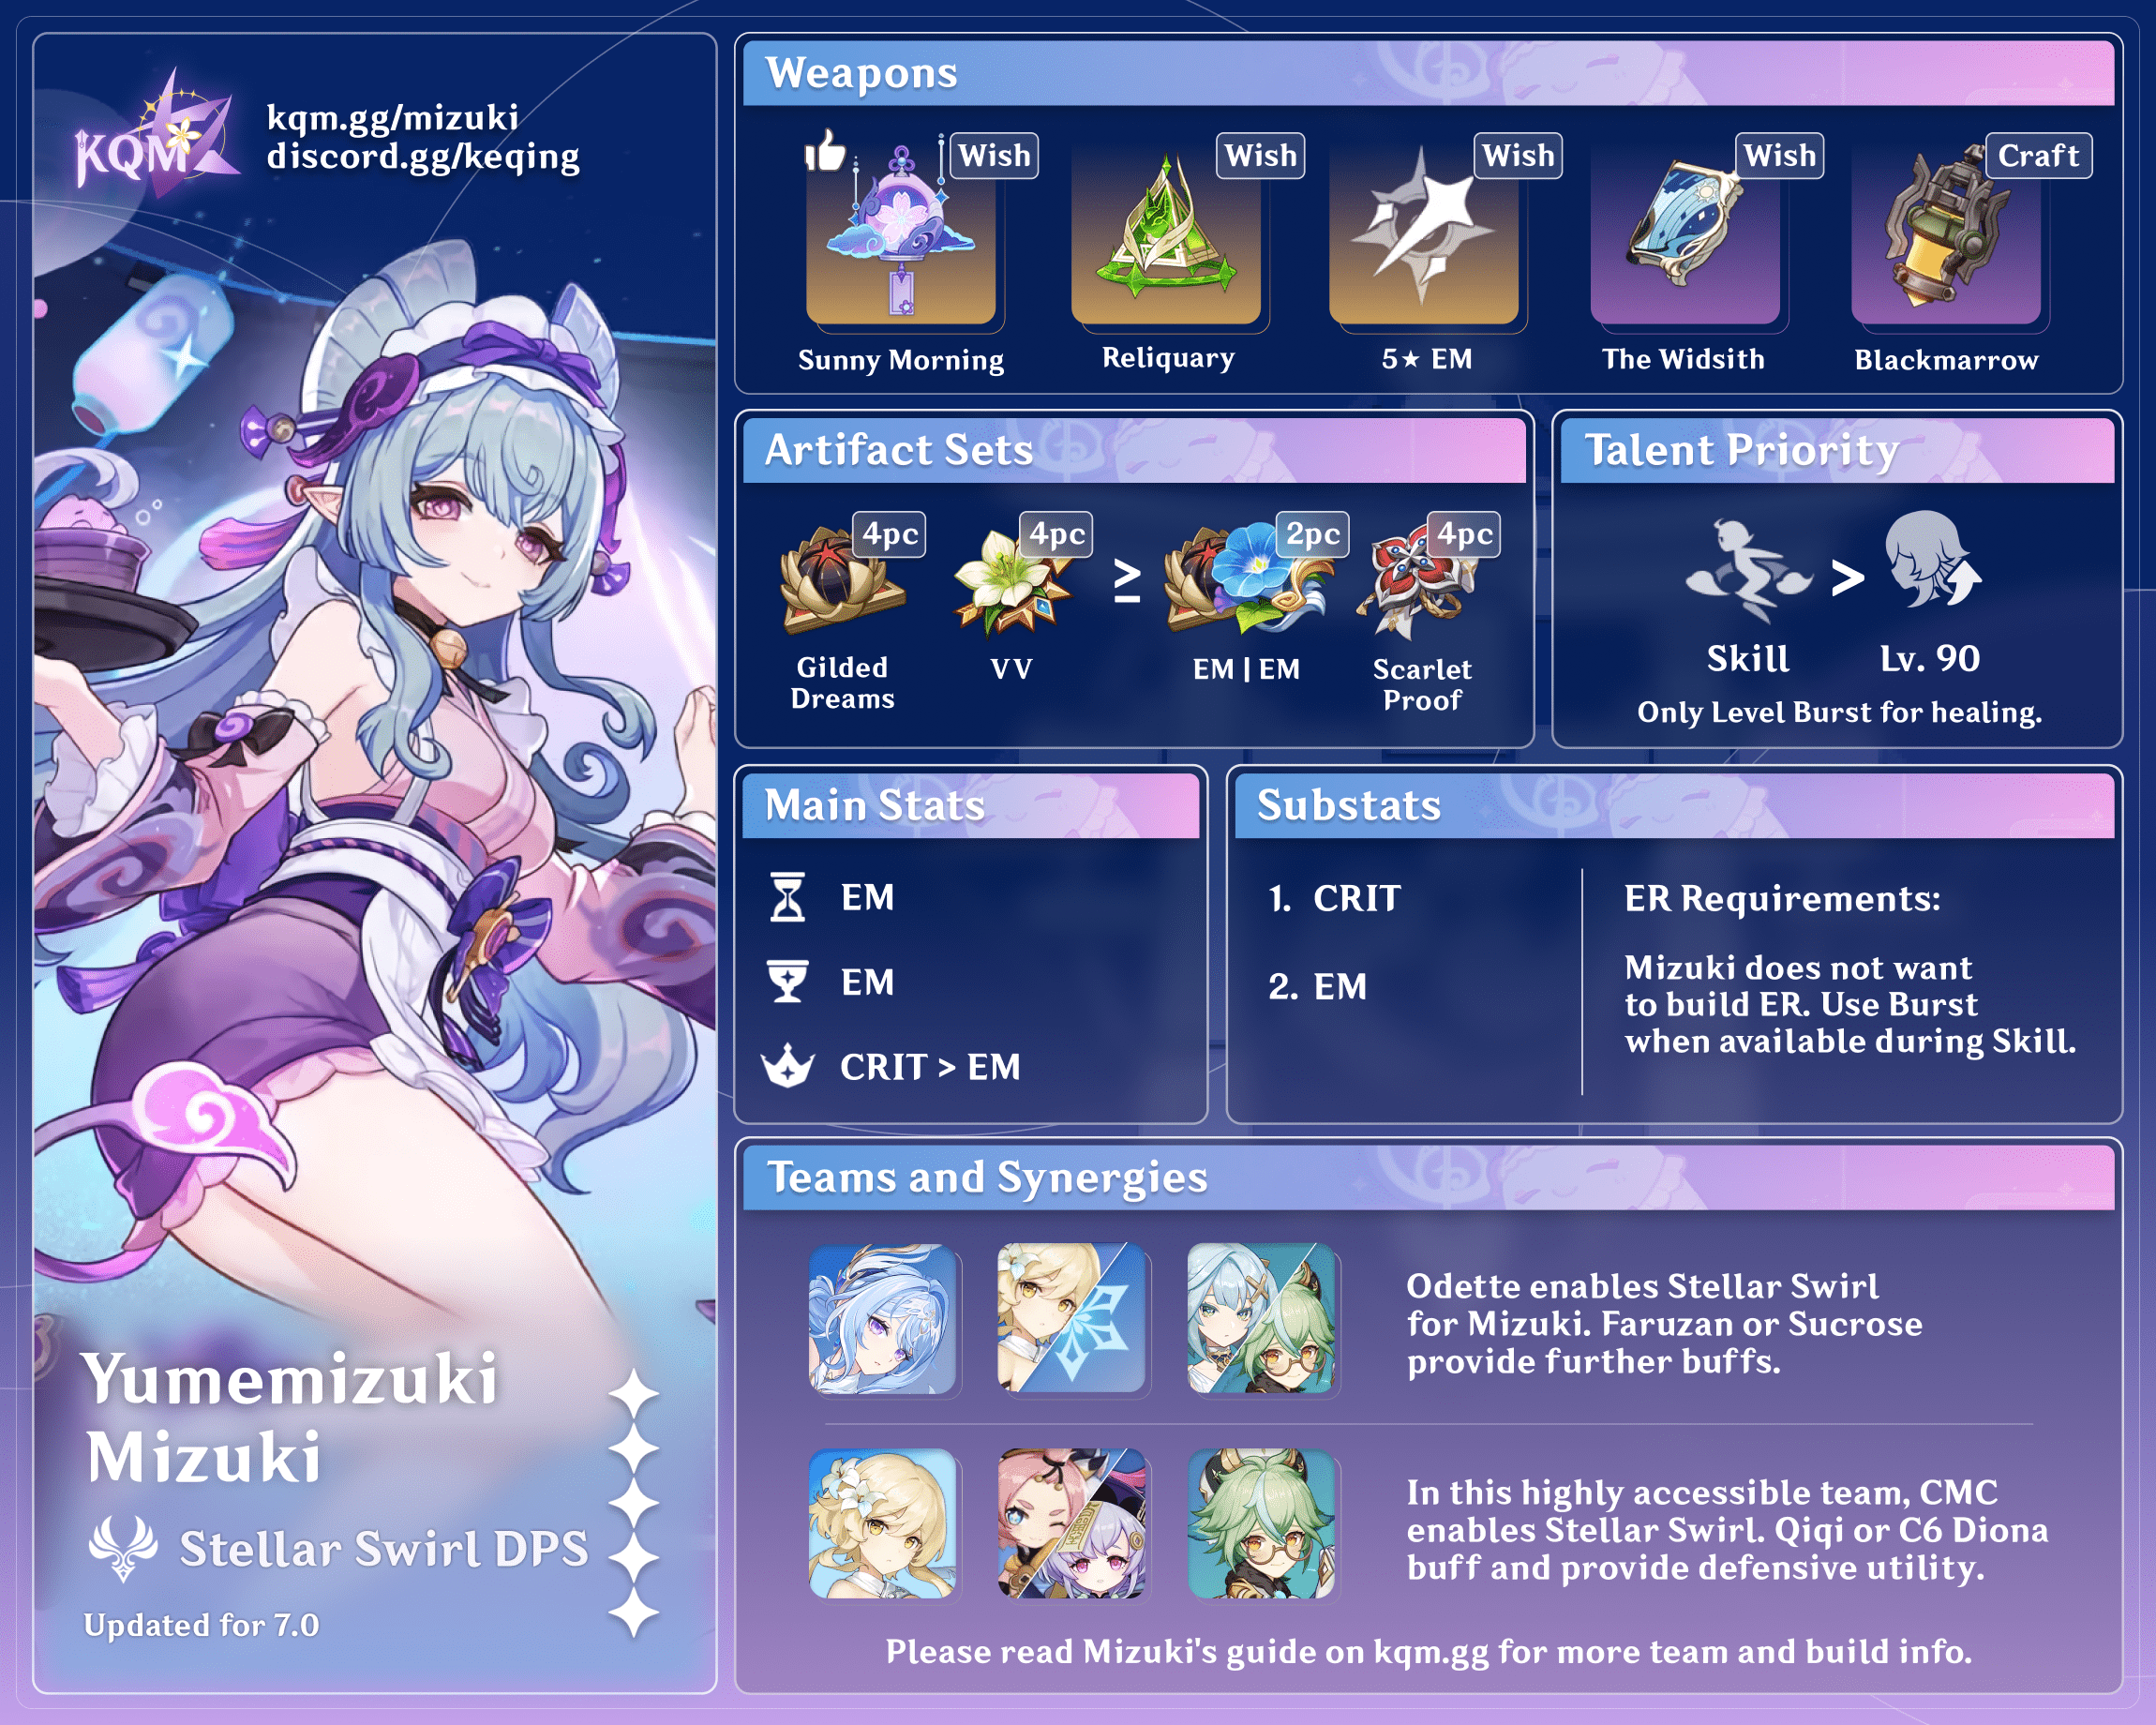
Credits to: euphorysm, baloopy, haafr, acerbus114 and KQM Staff
Character Overview
Pros
- Competitive performance with accessible teammates.
- Extremely simple to play mechanically, all you need to do is float around.
- Has healing built into her kit so no need to worry about sustain.
- Relatively easy to build as 2pc EM + 2pc EM mixed sets are among her best options.
- Scales decently with Constellations, a small consolation for anyone who loses their 50/50 to her in the future. Additionally, Mizuki and her Constellations can be obtained from annual anniversary rewards and from the permanently recurring event To Temper Thyself and Journey Far.
- Yumeglorpglorp.
Cons
- Very static playstyle; she spends her Skill duration floating around with nearly no player input needed.
- Limited team flexibility. Requires certain teammates to perform well.
Playstyles
On-Field Stellar Swirl DPS
Mizuki deals damage from her Witch’s Revelation Passive via triggering SSW while floating around in her Skill state. She pairs with teammates that enable SSW, deal damage, and apply Cryo to let her Swirl.
Stellar Swirl
With certain characters in the team (Odette, Cryo Traveler, Sandrone), Mizuki can trigger SSW and deal SSW damage directly from her kit. For the purposes of this guide, direct SSW damage refers to that which originates from her Talents, while all other uses of “SSW damage” should be assumed to refer to the damage resulting from triggering the Elemental Reaction.
For more information regarding SSW, check out this Stellar Glimmer Reaction Guide.
Talents
Level and Talent Priority
Skill > Character Level >> Burst
The majority of Mizuki’s damage comes from her Witch’s Revelation Passive’s direct SSW damage, so leveling her Talents yields no significant damage increase. However, her Skill still has priority as it provides SSW DMG Bonus to the whole team. Leveling Mizuki to 90/90 is overall a minor increase to her SSW damage.
Mizuki’s Burst only needs to be leveled until you are comfortable with her healing.
Talent Overview
 Normal Attack | Pure Heart, Pure Dreams
Talent Description
Normal Attack
Performs up to 3 attacks, dealing Anemo DMG.
Charged Attack
Consumes a certain amount of Stamina and deals AoE Anemo DMG after a short casting time.
Plunging Attack
Calling upon the power of Anemo, she plunges towards the ground from mid-air, damaging all opponents in her path. Deals AoE Anemo DMG upon impact with the ground.
Pretty but otherwise unremarkable. Mizuki’s Normal and Charged Attacks are rarely used and make up an insignificant part of her damage.
 Elemental Skill | Aisa Utamakura Pilgrimage
Talent Description
Weaves memories of lovely dreams, entering a Dreamdrifter state where she floats above the ground, and dealing 1 instance of AoE Anemo DMG to nearby opponents.
Dreamdrifter
- While in the Dreamdrifter state, Yumemizuki Mizuki will continuously drift forward, dealing AoE Anemo DMG to nearby opponents at regular intervals.
- During this time, Yumemizuki Mizuki can control her direction of drift, and the pick-up distance of Yumemi Style Special Snacks from the Elemental Burst Anraku Secret Spring Therapy will be increased.
- Increases the Swirl DMG that nearby party members deal based on Yumemizuki Mizuki’s Elemental Mastery.
- Dreamdrifter will end when Mizuki leaves the field or uses her Elemental Skill again.
The core of Mizuki’s kit. Upon tapping her Skill, she enters the Dreamdrifter state and floats around to deal Anemo damage at regular intervals. She is unable to use Normal or Charged Attacks, but can control the direction she moves in. Additionally, she provides the entire team a Swirl and SSW DMG Increase, scaling with her EM stat, and the pickup distance of her Burst’s Yumemi Snacks is increased.
 Elemental Burst | Anraku Secret Spring Therapy
Talent Description
Summons forth countless lovely dreams and nightmares that pull in nearby objects and opponents, dealing AoE Anemo DMG and summoning a Mini Baku.
Mini Baku:
Follows the current active character. At regular intervals, the Mini Baku will create 1 Yumemi Style Special Snack nearby. After a nearby active character picks up a Special Snack, if their HP is higher than 70%, the Snack will explode and unleash a Munen Shockwave, dealing 1 instance of AoE Anemo DMG to nearby opponents. Otherwise, it will heal the one who picked it up based on Yumemizuki Mizuki’s Elemental Mastery. When Yumemizuki Mizuki triggers healing by picking up a Yumemi Style Special Snack, the amount of healing is increased by 100%. If some time passes without a Snack being picked up, it will explode and release a Munen Shockwave, dealing 1 instance of AoE Anemo DMG to surrounding opponents.
Upon casting her Burst, Mizuki deals one instance of AoE Anemo damage and groups enemies around her. Her Burst also summons a Mini Baku, which will remain on field for 12s and follow the active character to create Yumemi Style Special Snacks at regular intervals.
The Yumemi Snacks work similar to Yaoyao’s radishes: upon being picked up, they will either heal the active character if their HP is below 70%, or explode to deal Anemo damage to nearby enemies. If they are left on-field without being picked up, they will eventually explode on their own. Additionally, if Mizuki is the one picking up the Yumemi Snack, its healing is increased by 100%.
 Ascension 1 Passive | Bright Moon’s Restless Voice
Talent Description
When Yumemizuki Mizuki triggers Swirl while in her Dreamdrifter state, Dreamdrifter’s duration increases by 2.5s. This effect can trigger once every 0.3s for a maximum of 2 times per Dreamdrifter state.
Mizuki’s Ascension 1 Passive lets her extend her Skill state up to 5s, for a total duration of 10s — effectively doubling her damage window. The trigger condition is simple enough that she is guaranteed to proc it due to her frequent Swirls.
 Ascension 4 Passive | Thoughts by Day Bring Dreams by Night
Talent Description
While Yumemizuki Mizuki is in the Dreamdrifter state, when other nearby party members hit opponents with Pyro, Hydro, Cryo, or Electro attacks, her Elemental Mastery will increase by 100 for 4s.
A nice increase to Mizuki’s damage. Her teams are already incentivized to run Pyro/Hydro/Electro/Cryo characters that attack regularly; activating and maintaining uptime on the EM buff is easy.
 Witch’s Revelation Passive | Vast Be the Dream
Talent Description
When Yumemizuki Mizuki triggers a Swirl reaction while in the Dreamdrifter state, the next instance of periodic AoE Anemo DMG she deals to nearby enemies during that same state will be increased by 1,000% of her Elemental Mastery. The aforementioned effect can trigger once every 2.5s.
Radiance: Stellar Swirl: When Yumemizuki Mizuki deals to an opponent the above enhanced AoE Anemo DMG, she will also deal an additional instance of Anemo DMG at 1,000% of her Elemental Mastery. This DMG is considered Stellar Swirl reaction DMG.
Mizuki enters the Radiance: Stellar Swirl state for 8s when a SSW reaction is triggered (enabled by certain characters such as Odette or Cryo Traveler).
During her Skill’s duration, Mizuki increases the whole team’s EM by 10% of her own. She also deals additional EM-scaling Anemo damage after triggering a Swirl or SSW reaction, with a cooldown of 2.5s. She usually procs this effect four times per Skill. Additionally, while in the Stellar Swirl state, she deals an extra instance of direct SSW damage on top of the Anemo damage. This direct SSW damage makes up the majority of Mizuki’s damage.
Constellations
All of Mizuki’s Constellations are improvements to her utility, buffs, or personal damage, and greatly improves her viability as an on-fielder.
 Constellation 1 | In Mist-Like Waters
Constellation Description
When Yumemizuki Mizuki is in the Dreamdrifter state, she will continuously apply the “Twenty-Three Nights’ Awaiting” effect to nearby opponents for 3s every 3.5s. When an opponent is affected by Anemo DMG-triggered Swirl reactions while the aforementioned effect is active, the effect will be canceled, and this Swirl instance has its DMG against this opponent increased by 1,100% of Mizuki’s Elemental Mastery. She also launches an additional attack on the same opponent, dealing Anemo DMG equal to 1,000% of Yumemizuki Mizuki’s Elemental Mastery.
Radiance: Stellar Swirl: The aforementioned additional DMG is changed to Anemo DMG at 400% of Yumemizuki Mizuki’s Elemental Mastery. This DMG is considered Stellar Swirl reaction DMG.
Mizuki’s C1 provides an Additive Base DMG Bonus to a Swirl or SSW damage instance based on her EM. While this effect can only be triggered a maximum of three times per Skill, it applies to all enemies hit by said enhanced Swirl/SSW. Additionally, each time this effect is triggered, Mizuki launches an Anemo attack that is considered as direct SSW damage when she is in her Stellar Swirl state.
Overall this is a good and straightforward personal damage increase for Mizuki.
 Constellation 2 | Your Echo I Meet in Dreams
Constellation Description
When Yumemizuki Mizuki enters the Dreamdrifter state, every Elemental Mastery point she has will increase all nearby party members’ Pyro, Hydro, Cryo, and Electro DMG Bonuses by 0.04% until the Dreamdrifter state ends.
Additionally, while Yumemizuki Mizuki is in the Dreamdrifter state, the Pyro RES, Hydro RES, Cryo RES, Electro RES, and Anemo RES of nearby opponents are lowered by 20%.
This Constellation lets Mizuki provide the same DMG Bonus buff as Kazuha’s A4 Passive, and 20% RES Shred to Pyro, Hydro, Cryo, Electro and Anemo. Its sole caveat is that it is tied to her Dreamdrifter state, which ends the moment she leaves the field. Nonetheless, a decent Constellation for her on-field playstyle.
 Constellation 3 | Till Dawn’s Moon Ends Night
Constellation Description
Increases the Level of Aisa Utamakura Pilgrimage by 3.
Maximum upgrade level is 15.
More Talent levels for Mizuki’s Skill. While her Skill Talent damage is insignificant, extra Talent levels are still appreciated to increase the Swirl/SSW DMG Bonus it offers.
 Constellation 4 | Buds Warm Lucid Springs
Constellation Description
Picking up a Yumemi Style Special Snack from the Elemental Burst Anraku Secret Spring Therapy will both deal DMG and heal. It will also heal a nearby party member with lower HP for 266% of Yumemizuki Mizuki’s Elemental Mastery, as well as regenerate 5 Energy for Yumemizuki Mizuki. Energy can be restored this way 4 times per Anraku Secret Spring Therapy duration.
Mizuki’s C4 removes the HP restriction on her Burst, letting Mizuki heal, apply Anemo (albeit with standard ICD), and deal damage with every Yumemi Snack. It also heals a teammate with low HP and restores up to 20 Energy per Burst, reducing Mizuki’s ER requirements to Burst every rotation considerably. A significant Quality-of-Life upgrade and a slight increase in Anemo application.
 Constellation 5 | As Setting Moon Brings Year’s End
Constellation Description
Increases the Level of Anraku Secret Spring Therapy by 3.
Maximum upgrade level is 15.
Talent levels for Mizuki’s Burst. The damage increase is insignificant, but the increased healing offers some extra comfort. For players who decide to build Mizuki after getting her C5, it can also save some resources by making it cheaper to reach the necessary Burst Level to comfortably rely on her healing.
 Constellation 6 | The Heart Lingers Long
Constellation Description
While Yumemizuki Mizuki is in the Dreamdrifter state, Swirl DMG dealt by nearby party members can score CRIT Hits, with CRIT Rate fixed at 30%, and CRIT DMG fixed at 100%.
Every point of Elemental Mastery Yumemizuki Mizuki has in excess of 500 increases her CRIT Rate by 0.04% and her CRIT DMG by 0.16%. Yumemizuki Mizuki’s CRIT Rate and CRIT DMG can be increased by up to 20% and 80% in this way, respectively.
During Mizuki’s Skill, her C6 gives regular Swirls dealt by all teammates a roughly 1 in 3 chance to CRIT. It has a fixed 30% CRIT Rate and 100% CRIT DMG, which translate to 30% Swirl damage increase.
For SSW, this Constellation gives SSW damage (both direct and reaction) dealt by all teammates 10% CRIT Rate and 20% CRIT DMG. On top of that, Mizuki also gains CRIT Rate and CRIT DMG based on her EM over 500. This caps at 20% CRIT Rate and 80% CRIT DMG Bonus, at 1000 EM in total.
This Constellation is easily her best one for both personal and team DPS. It is a fitting capstone Constellation for the game’s first dedicated Swirl/SSW DPS.
Combos
Combo Notation
- N = Normal Attack
- C = Charged Attack
- A = Aimed Shot
- P = Plunging Attack
- hP = High Plunge
- lP = Low Plunge
- E = Elemental Skill
- tE = Tap Skill
- hE = Hold Skill
- Q = Elemental Burst
- D = dash (cancel)
- J = jump (cancel)
- W = walk (cancel)
- > = switch character
- ( ) = these actions are optional; please refer to the notes below
- [ ] = repeat these actions the specified number of times
| (Q) E / E(Q) | Mizuki is unable to use input-based attacks in her Skill state. Instead she automatically attacks at a fixed interval. As such, she has no notable combo beyond “float around”. Whether Mizuki’s Burst is used before or during her field time matters little. |
Artifacts
ER Requirements
Calcs for ER requirements can be found here (last updated for Version 7.0).
| Burst every other rotation | Baseline | C4 |
| C6 Faruzan | 100% | 100% |
| Sucrose / Pre-C6 Faruzan | 100–120% | 100% |
| Other Teams | 100–130% | 100% |
| Burst every rotation (Not recommended) | Baseline | C4 |
| C6 Faruzan | 160–185% | 110–125% |
| Other Teams (including Sucrose / Pre-C6 Faruzan) | 200%+ | 130–175% |
Mizuki has the higher end of her ER requirements in teams without any Favonius weapons on the Cryo units.
It is never a DPS gain to build ER so that Mizuki can use her Burst more frequently; instead, players should use her Burst whenever available and treat her Burst as an emergency panic button when taking too much damage. Additionally, when the team’s Cryo application is limited, casting her Burst can lead to a DPS loss from desyncing the SSW pattern for her Witch’s Revelation Passive.
Use the Energy Recharge Calculator to determine exact requirements for your team and rotation. For more details on how Favonius weapons will affect your team, please use Ac1d’s Favonius Mastersheet.
Artifact Stats
 Sands |  Goblet |  Circlet |
| Elemental Mastery | Elemental Mastery | CRIT > EM |
Stat Priority: CRIT ≥ EM >> ER
In SSW teams, CRIT Circlets are generally better than EM ones before C6. At C6, both are similar to each other. Do not actively build ER on Mizuki; she only casts Burst whenever it is available. As such, ER rolls are merely a nice bonus.
Outside of SSW, Mizuki uses triple EM main stats as regular Swirl cannot CRIT. ER Sands and ER substats become more viable as Mizuki does not lose much damage in exchange for more healing.
Artifact Sets
All of Mizuki’s artifact options perform very close to each other. Hence, it is recommended to use pieces with better substat quality rather than forcing a complete set.
 4pc Gilded Dreams (GD) | Mizuki’s BiS artifact set for personal damage in SSW teams. She can get 100 EM from the 4pc’s effect in a team with one Anemo teammate, or 150 EM in Solo Anemo teams. However, as her current best teams are usually Double Anemo, this set is not much better than 2pc EM + 2pc EM or 4pc Scarlet Proof. |
 2pc EM + 2pc EM Mixed Sets | A mixed 2pc + 2pc set performs nearly as well as a 4pc GD set with equal substats, but it is often better in practice due to being much easier to farm. |
 4pc Scarlet Proof (SP) | Despite being an Anemo character who can directly deal SSW damage from her kit, 4pc SP is not Mizuki’s best set for personal damage as the 2pc’s ATK% Bonus is useless on her. However, 4pc SP still has decent performance on Mizuki, so it can be useful for players who are also farming for 4pc Heart of the Furnace and do not have a good 4pc GD or 2pc mixed sets for Mizuki yet. |
 4pc Viridescent Venerer | In SSW teams, 4pc VV is bad for Mizuki’s personal damage as the majority of her damage is Anemo, which does not benefit from the set’s Cryo RES Shred. However, it can be a good set when pairing with Odette and Cryo Traveler, whose Cryo damage contributes a sizable portion of team DPS. However, this set can also be used on another Anemo teammate, allowing Mizuki to run the other sets listed above. This often leads to similar or slightly better team performance, especially when Mizuki has more Constellations. Outside of SSW, 4pc VV is the default set to run as buffing off-field damage dealers through the set’s RES Shred is always better for team DPS. |
Weapons
 5★ Sunny Morning Sleep-In | Mizuki’s signature weapon is a massive EM stat stick, and the best option for her personal damage. |
 5★ Reliquary of Truth | Providing CRIT DMG, CRIT Rate and EM, Reliquary performs excellently as the second-best Catalyst for Mizuki. |
  5★ Starcaller’s Watch, A Thousand Floating Dreams | These two are good 5-star EM weapons that Mizuki can use. Starcaller’s Watch gives her more EM, while Thousand Floating Dreams slightly buff her teammates. |
 4★ Widsith | Mizuki’s best accessible option in general. Despite having two useless buffs and its passive is only up for once every two rotations, its tremendous EM buff and CRIT DMG secondary stat make it a good choice for Mizuki’s personal damage, regardless. |
 4★ Sacrificial Fragments | In Faruzan teams where there is downtime before her Burst resets, using R5 Sacrificial Fragments on Mizuki to extend her field time by 1 or 2 seconds can result in a higher performance than playing normally with Widsith. The extra Skill uptime allows Mizuki to proc one additional instance of both her Witch’s Revelation Passive and C1. However, outside of these setups, Sacrificial Fragments only matches Blackmarrow Lantern. Sacrificial Fragments combo: E (activation) > Wait around 1-2s > E (deactivation) > E (reactivation) |
 Widsith Sidegrades | Nightweaver’s Looking Glass, 5-star 88.2% CRIT DMG Catalysts, Clash of Kings, Dawning Frost, Sacrificial Jade Other good Catalysts that share similar performance to R5 Widsith, albeit with better consistency. |
 Widsith Downgrades | Blackmarrow Lantern, Etherlight, Magic Guide, Wandering Evenstar, Echoes of the Heart Various EM stat sticks that perform equal to or worse than R1 Widsith. Only use them when Widsith is not available. |
Teams
Rotation Notation
- N = Normal Attack
- C = Charged Attack
- A = Aimed Shot
- P = Plunging Attack
- E = Elemental Skill
- tE = Tap Skill
- hE = Hold Skill
- Q = Elemental Burst
- D = dash (cancel)
- J = jump (cancel)
- W = walk (cancel)
- > = switch character
- ( ) = these actions are optional; please refer to the notes below
- [ ] = repeat these actions the specified number of times
Teambuilding
- Pair Mizuki with at least one SSW enabler.
- Teammates with off-field Cryo application are mandatory for SSW.
On-Field Stellar Swirl DPS

Mizuki’s ideal playstyle; she pairs with several off-field Cryo units to trigger SSW. As of 7.0, either Odette or Cryo Traveler are needed to enable the reaction.
Notable Teammates
Stellar Swirl Enabler
Mizuki can deal direct SSW damage; however, she cannot enable the reaction herself. As of the time of writing, either Odette or Cryo Traveler are needed to enable the reaction. However, the best team setup uses both of them.
 Odette | Odette enables and buffs SSW with her teamwide Stellar DMG Bonus. She also deals decent damage and applies off-field Cryo from her Skill. Odette is the prime candidate for 4pc HotF thanks to her periodic direct SSW damage. |
 Cryo Traveler | Cryo Traveler is an accessible yet powerful SSW enabler that applies off-field Cryo from their Skill. They also give Mizuki 120 EM from their C2, and up to 40% Stellar DMG Bonus to the entire team at C6. The majority of Cryo Traveler’s damage comes from their Burst and enhanced Charged Attack that deal direct SSW damage. |
Cryo
If only one of Odette and Cryo Traveler is on the team, another Cryo unit should be used to enable Cryo Resonance and apply additional Element. C6 Diona and Qiqi can also be used as the third Cryo unit thanks to their good buffs.
 ★ C6 Diona | Diona’s C6 provides 200 EM and 40% SSW DMG Bonus to Mizuki, marking her as the best Cryo alternative to Odette and Cryo Traveler. Her only downside is her long Burst cooldown, and her reliance on C6 for competitive performance. |
 ★ Qiqi | Qiqi gives a teamwide SSW DMG Bonus and Additive Base DMG Bonus (at C6) to Mizuki. Overall a good Cryo option for the team. |
 Escoffier | Escoffier applies constant Cryo, shreds Cryo RES and deals some damage. She can use her Burst for more healing. |
   Citlali, Layla, Charlotte | Cryo shielders and healers for more defensive utility. Citlali should use Sacrificial Fragments to enable her off-field Skill without using Burst. |
Anemo
Anemo Resonance slightly decreases the cooldown of the whole team, allowing it to rotate faster. Anemo units also help the team trigger more SSW, provide their own buffs and hold 4pc Instructor or 4pc VV. The latter set should only be used when the Cryo teammates contribute significant damage (Odette and Cryo Traveler); otherwise, 4pc Instructor is better as it increases Mizuki’s damage more.
 ★ Faruzan | Faruzan shreds Anemo RES and, at C6, provides a CRIT DMG buff to Anemo damage, which also applies to direct Anemo SSW damage dealt by Mizuki. As such, C6 Faruzan is the best Anemo support for Mizuki so far. However, without her C6, she often performs worse than Sucrose. Faruzan can use her Burst every other rotation to shorten team rotation; she uses a Skill followed by a Charged Attack on rotations without Burst. |
 ★ Sucrose | Sucrose buffs EM, which increases the team output significantly. She does not require any Constellation to perform. Sucrose either uses Wandering Evenstar, Sacrificial Fragments, or TTDS (to buff Odette or Cryo Traveler). |
  Heizou, Jahoda | Heizou and Jahoda are Sucrose’s downgrade as their EM buffs are lower. However, it is easy to use Prototype Amber and Burst every rotation with Heizou for healing, and Jahoda already has healing built in her kit. |
   Venti, Kazuha, Lynette | These characters apply Anemo and Cryo (via Absorption) from off-field, thus contributing to the team with their personal damage. Venti and Kazuha also have useful grouping. |
 Lan Yan | Anemo shielder that can be used for more sustain. She can use TTDS to buff Odette or Cryo Traveler. |
 C4 Jean | Despite having a useful Anemo RES Shred buff, Jean’s Burst’s cooldown is too long, and she does not provide anything without her Burst. |
Flex
Some characters that are not Cryo or Anemo can still be used if they do not interfere much with the SSW reaction.
 ★ Yae Miko | Yae is a surprisingly good option with Odette, supplementing the team with her personal damage. While Yae often leads to less personal DPS from Mizuki, the team DPS is competitive with Mizuki’s top options. Mizuki–Yae teams become the best choice for team DPS if Yae has C2. |
 Zhongli | Zhongli provides a sturdy shield and Universal RES Shred. He can hold 4pc Instructor for more buffs. |
Example Teams
This is not a comprehensive list of teams. The inclusion or exclusion of any given team does not necessarily reflect its power level.
Note: If Odette is more invested than Cryo Traveler, swap their action order in the rotation so that Odette can benefit from Cryo Traveler’s C2 and other buffs such as VV RES Shred or Diona’s C6.

Sample Rotation (Faruzan)
Odette 2[E] > Faruzan Q / E C¹ > Traveler E² N1C Q > Mizuki E (Q)
¹Burst whenever available; otherwise, use a Skill followed by a Charged Attack.
²In the first rotation, Traveler only uses their Skill.
Sample Rotation (Sucrose)
Odette 2[E] > Sucrose N1 ED (Q)¹ > Traveler² E N1C Q > Mizuki E (Q)
¹Burst whenever available.
²In the first rotation, Traveler only uses their Skill.

Sample Rotation (C6 Diona)
Odette 2[E] > Diona hE(Q)¹ > Traveler E² N1C Q > Mizuki E (Q)
¹Burst every other rotation.
²In the first rotation, Traveler only uses their Skill.
Sample Rotation (Qiqi)
Qiqi E > Odette 2[E] > Traveler¹ E N1C Q > Mizuki E (Q)
¹In the first rotation, Traveler only uses their Skill.

Sample Rotation ( Lan Yan)
Odette 2[E] > Lan Yan 2[E] > Traveler¹ E N1C Q > Mizuki E (Q)
¹In the first rotation, Traveler only uses their Skill.
Sample Rotation ( Zhongli)
Odette 2[E] > Zhongli hED > Traveler¹ E N1C Q > Mizuki E (Q)
¹In the first rotation, Traveler only uses their Skill.

Sample Rotation (Odette)
Diona hE(Q)¹ > Sucrose N1 ED (Q)² > Odette 2[E] > Mizuki E (Q)
¹Burst every other rotation.
²Burst whenever available.
Sample Rotation (Cryo Traveler)
Diona hE(Q)¹ > Sucrose N1 ED (Q)² > Traveler E N1C³ Q > Mizuki E (Q)
¹Burst every other rotation.
²Burst whenever available.
³Skip the N1C in the first rotation.

Sample Rotation
Qiqi E > Sucrose N1 ED (Q)¹ > Traveler E N1C² Q > Mizuki E (Q)
¹Burst whenever available.
²Skip the N1C in the first rotation.

Sample Rotation
Yae 3[E] > Odette 2[E] > Qiqi E(Q)¹ > Mizuki (Q) E
¹At C6.
On-Field Swirl DPS

Without an SSW enabler, Mizuki deals only regular Swirl damage, severely limiting her on-field DPS potential. Therefore, these teams are recommended only as a last resort when no SSW enablers are available.
Mizuki uses 4pc VV in these teams.
Example Teams
This is not a comprehensive list of teams. The inclusion or exclusion of any given team does not necessarily reflect its power level.



Credits
acerbus114, luke_260, cosmic_wanderer_, luwunae, baloopy, caramielle., haafr, sew, ac1d, idkanonymized, Vesera
Team images made with the KQM portrait generator.