Updated for Version “Luna I”

Keqing is a 5★ Electro Sword character in Genshin Impact who serves as an on-field DPS to shred enemies with fast-hitting attacks. Learn about Keqing’s best builds, best weapons, best artifacts, and best teams in this quick guide.
Note that the information given may change if new discoveries are made. More extensive testing is in progress.
The full-length guide is available here. It is being updated.
Table of Contents
New Content
 Ineffa | Ineffa is a massive buff to Electro-Charged compositions, making premium Lunar-Charged teams Keqing’s top option in terms of team damage. She also improves the archetype’s survivability, rotational flexibility, and vertical ceiling. |
Lauma | An incredibly impactful new unit in Keqing’s Quickbloom and Hyperbloom teams who offers extremely large buffs to Bloom-related damage. |
Aino | Aino’s personal damage leaves something to be desired, but she provides valuable buffs to Keqing’s Lunar-Charged teams and fully enables 4pc Night of the Sky’s Unveiling. |
 Night of the Sky’s Unveiling | A powerful new artifact set for Keqing that requires two Nod-Krai characters on the team to be used to its full potential. |
 Moonweaver’s Dawn | A passable free choice for Keqing that offers a large amount of Burst DMG%. |
 Level 100 | Although the reaction scaling from leveling up is far less when leveling from 90 to 100 compared to leveling from 80 to 90, the much higher Base ATK growth compensates for this and ensures that Level 100 remains a solid increase to Keqing’s damage. However, it is very expensive and Keqing’s damage share in her teams is not enough to justify using such a limited resource on her unless you play her extremely often. |
Infographics
Aggravate DPS
Credits to: euphorysm, cuppacote, auraolis, haafr, casdela, acerbus114, dusted wind, and KQM TC Staff
Quickbloom DPS
Credits to: auraolis, acerbus114, dusted wind, and KQM TC Staff
Electro DPS
Credits to: cuppacote, auraolis, haafr, casdela, acerbus114, dusted wind, and KQM TC Staff
Character Overview
Pros
- Highly flexible rotations
- Highest amount of Burst iframes in the entire game
- Teleport can be valuable utility and counters certain boss mechanics
- Fast hits and excellent Fischl-driving capabilities make her strong against content that requires high hit counts
Cons
- Weak Constellations
- Charged Attacks may knock light enemies away and/or consume high amounts of Stamina
- Lower personal damage when compared to newer 5-star DPS units
Playstyles
On-Field DPS
Keqing uses her Skill to generate an Electro Infusion and deals damage through her entire kit.
Talents
Level and Talent Priority
Level 90* > Normal Attack ≥ Burst > Skill
*Level 90 is highly recommended to maximize Keqing’s damage in teams where she triggers Dendro reactions. Level 100 is a similarly powerful increase, but is far more costly and uses a highly contested resource, making it extremely optional.
Keqing’s damage profile is split quite evenly among her Talents, and she should level them all roughly equally. If using 4pc Thundering Fury, Skill is relatively even with Burst.
Talent Overview
![]() Normal Attack | Yunlai Swordsmanship
Normal Attack | Yunlai Swordsmanship
Talent Description
Normal Attack
Performs up to 5 rapid strikes.
Charged Attack
Consumes a certain amount of Stamina to unleash 2 rapid sword strikes.
Plunging Attack
Plunges from mid-air to strike the ground below, damaging opponents along the path and dealing AoE DMG upon impact.
Keqing’s largest source of single-target damage. Note that her Charged Attacks consume 25 Stamina and can knock light enemies out of range. Nevertheless, N1C is her highest damaging and thus preferred combo string.
![]() Elemental Skill | Stellar Restoration
Elemental Skill | Stellar Restoration
Talent Description
Hurls a Lightning Stiletto that annihilates her opponents like the swift thunder.
When the Stiletto hits its target, it deals Electro DMG to opponents in a small AoE, and places a Stiletto Mark on the spot hit.
Hold
Hold to adjust the direction in which the Stiletto shall be thrown.
Stilettos thrown by the Hold attack mode can be suspended in mid-air, allowing Keqing to jump to them when using Stellar Restoration a second time.
Lightning Stiletto
If Keqing uses Stellar Restoration again or uses a Charged Attack while its duration lasts, it will clear the Stiletto Mark and produce different effects:
If she uses Stellar Restoration again, she will blink to the location of the Mark and unleash one slashing attack that deals AoE Electro DMG. When blinking to a Stiletto that was thrown from a Holding attack, Keqing can leap across obstructing terrain.
If Keqing uses a Charged Attack, she will ignite a series of thundering cuts at the Mark’s location, dealing AoE Electro DMG.
When Keqing casts her Elemental Skill, she throws a Stiletto that deals damage when it lands on enemies. Recasting her Skill will cause her to teleport onto the Stiletto and gain an Electro Infusion through her Ascension 1 Passive. Alternatively, performing a Charged Attack while the Stiletto is active will detonate the Stiletto and deal AoE Electro damage without granting the Electro Infusion. Regardless of how the Stiletto is used, Keqing will generate Electro particles upon hitting an enemy.
Unlike other characters with teleports, Keqing does not immediately jump to her Stiletto when it is cast. This allows her high freedom of gameplay, especially given that the Skill cooldown starts once the Stiletto is cast and not when she teleports.
Because detonating the Stiletto does not grant Keqing an Electro Infusion, Keqing will usually opt to recast her Skill. The detonation effect is primarily useful when using 4pc Thundering Fury, as its Skill cooldown reduction effect allows her to cast two Skills in one combo.
![]() Elemental Burst | Starward Sword
Elemental Burst | Starward Sword
Talent Description
Keqing unleashes the power of lightning, dealing Electro DMG in an AOE.
She then blends into the shadow of her blade, striking a series of thunderclap-blows to nearby opponents simultaneously that deal multiple instances of Electro DMG.
The final attack deals massive AoE Electro DMG.
Keqing’s largest source of AoE damage. The rapid multihits allow this Burst to trigger four Aggravates per cast.
In addition to her invincibility during her Burst animation, Keqing has an outrageous amount of idle iframes, which can be extremely useful to simply wait out enemy attacks before continuing with the rest of her combo. This is particularly helpful against aggressive enemies, especially when Keqing is unshielded.
![]() Ascension 1 Passive | Thundering Penance
Ascension 1 Passive | Thundering Penance
Talent Description
After recasting Stellar Restoration while a Lightning Stiletto is present, Keqing’s weapon gains an Electro Infusion for 5s.
Allows Keqing to function properly as an on-field Electro DPS. This Infusion lasts even if Keqing switches out, although one must be mindful of the Infusion’s short 5-second duration. Note that this Infusion is overridden by other Elemental Infusions, such as the Pyro Infusion provided by C6 Bennett.
![]() Ascension 4 Passive | Aristocratic Dignity
Ascension 4 Passive | Aristocratic Dignity
Talent Description
When casting Starward Sword, Keqing’s CRIT Rate is increased by 15%, and her Energy Recharge is increased by 15%. This effect lasts for 8s.
An excellent CRIT Rate buff for Keqing that lasts for her entire on-field window. Remember this exists so your build doesn’t overcap on CRIT Rate by accident. The 15% Energy Recharge is one of many reasons why you should never need to build ER on Keqing.
Constellations
Keqing is a complete unit at C0, and her Constellations do not change her gameplay. Similar to most other characters on the standard banner, Keqing’s Constellations are quite weak when compared to newer DPS units.
![]() Constellation 1 | Thundering Might
Constellation 1 | Thundering Might
Constellation Description
Recasting Stellar Restoration while a Lightning Stiletto is present causes Keqing to deal 50% of her ATK as AoE Electro DMG at the start point and terminus of her Blink.
Adds a slight bit of damage to Keqing’s Elemental Skill. Note that this disables some niche Swirl setups with Nahida, although this drawback can usually be rotated around with minimal issue.
![]() Constellation 2 | Keen Extraction
Constellation 2 | Keen Extraction
Constellation Description
When Keqing’s Normal and Charged Attacks hit opponents affected by Electro, they have a 50% chance of producing an Elemental Particle.
This effect can only occur once every 5s.
A slight bit of extra particle generation. Mostly irrelevant, as Keqing’s teams are usually Energy-rich anyways.
![]() Constellation 3 | Foreseen Reformation
Constellation 3 | Foreseen Reformation
Constellation Description
Increases the Level of Starward Sword by 3.
Maximum upgrade level is 15.
A simple increase to her Elemental Burst damage.
![]() Constellation 4 | Attunement
Constellation 4 | Attunement
Constellation Description
For 10s after Keqing triggers an Electro-related Elemental Reaction, her ATK is increased by 25%.
A solid ATK% buff that gives Keqing a pleasant damage boost. This is arguably Keqing’s first Constellation with any significant impact.
![]() Constellation 5 | Beckoning Stars
Constellation 5 | Beckoning Stars
Constellation Description
Increases the Level of Stellar Restoration by 3.
Maximum upgrade level is 15.
Keqing’s Skill isn’t quite as big a part of her damage as her Burst, but the Talent levels are appreciated nonetheless.
![]() Constellation 6 | Tenacious Star
Constellation 6 | Tenacious Star
Constellation Description
When initiating a Normal Attack, a Charged Attack, Elemental Skill or Elemental Burst, Keqing gains a 6% Electro DMG Bonus for 8s.
Effects triggered by Normal Attacks, Charged Attacks, Elemental Skills and Elemental Bursts are considered independent entities.
A quite useful bundle of DMG%. Although there isn’t a very high bar to clear, this is Keqing’s best Constellation.
Combos
Combo Notation
- N = Normal Attack
- C = Charged Attack
- A = Aimed Shot
- P = Plunging Attack
- hP = High Plunge
- lP = Low Plunge
- E = Elemental Skill
- tE = Tap Skill
- hE = Hold Skill
- Q = Elemental Burst
- D = dash (cancel)
- J = jump (cancel)
- W = walk (cancel)
- > = switch character
- ( ) = these actions are optional; please refer to the notes below
- [ ] = repeat these actions the specified number of times
Non–4pc TF Combo
| EQE¹ 5[N1C] (N1)² | Keqing’s default combo when not using 4pc TF. |
4pc TF Combo
Shortening Keqing Combos
The combos listed above fit as much damage as possible in an ~8s window, and swap out when Keqing’s Electro Infusion expires. However, Keqing’s field time can be quite flexible. Keqing can usually safely cut a few Normal / Charged Attacks off of the end of her combo without suffering much DPS loss, e.g. EQE 3[N1C] N1 instead of EQE 5[N1C]. This can be useful when an enemy moves outside of Keqing’s attacking range, when a wave is defeated, or when enemies are too aggressive to safely complete a full Keqing combo. Keqing’s combo can technically be shortened even further if enemies are exceptionally dangerous, where Keqing switches out essentially the second she faces too much threat. However, this often leads to cooldown issues later on in the rotation that will have to be improvised around.
Keqing’s combos can also be shortened in another fashion. In some teams (which are usually Quickbloom or Lunar-Charged), Keqing performs an on-field combo twice per rotation, but her combos are less than 12 seconds apart. This forces Keqing to skip her Burst every other DPS window, e.g. EE 5[N1C]. While not a particularly pleasant situation, this is generally better than dragging out a rotation’s length just to fit Keqing’s full combo.
Extending Keqing Combos
Although extending Keqing’s field time is generally rarer than shortening it, Keqing can easily extend her combo by recasting her Skill at the end of her initial window, e.g. EQE 5[N1C] EE 3[N1C]. This is rarely recommended in set rotations, but can be useful when Keqing needs to buy time for teammate cooldowns, or just to kill a particularly low-health enemy. Note that casting this many Charged Attacks may lead to quite the drain on your Stamina.
A common misconception is that 4pc Thundering Fury helps extend Keqing’s combo duration thanks to the Skill cooldown reduction effect. However, because Keqing’s Skill cooldown is shorter than her basic combo duration, 4pc Thundering Fury has zero impact on Keqing’s Infusion uptime — your Skill will be available by the time your Infusion expires with or without 4TF. In fact, these combo extensions are incompatible with optimal 4TF combos, as the second Skill detonation will put Keqing’s E on cooldown. However, even if you are forced to extend off of a generic combo, 4TF will often still be of great help in syncing your cooldowns as the rotation progresses, especially if you are extending your combo out of improvisation rather than pre-planned intention.
Note that Stamina can become a noticeable issue when extending Keqing’s combos due to the high Stamina consumption of Keqing’s Charged Attacks. N4C is Keqing’s recommended combo string for when Stamina is low, but it is frankly often advisable to simply switch off Keqing instead, although this will occasionally lead to further cooldown issues.
ER Requirements
Due to her low-cost Burst, Energy-laden teams, and A4 buff, Keqing’s ER requirements are effectively nonexistent in the vast majority of her teams. Even in her Solo Electro teams, the rotation lengths are usually too short for her to cast Burst twice per rotation anyway, voiding the problem entirely.
However, there are a few Keqing teams where Keqing casts Burst twice per rotation and particle generation is quite low. This most commonly occurs when replacing Fischl with Sara, e.g. Keqing–Sara–Nahida–Xilonen. In these cases, Keqing’s ER requirements can become quite existent, up to heights of ~140–150%. Finding a way to cast more than two Skills per rotation slashes such requirements significantly — for example, in the given Aggravate team, Keqing can run 4pc Thundering Fury and double her particle generation per combo. This alone often cuts Keqing’s ER requirements down to the point where it can be completely covered by her A4 Passive.
In general, Keqing should not seek out ER as a stat. If you are engineering rotations where Keqing needs significant amounts of ER, you are probably best off changing the rotation entirely.
Dendro
Artifact Stats
 Sands |  Goblet |  Circlet |
| ATK% / EM | Electro DMG% | CRIT |
Stat Priority: CRIT > ATK% = EM*
Since Aggravate hits can crit, CRIT is exceptionally valuable in Quicken teams, even more so than usual.
*ATK% and EM are roughly equal in Aggravate, but EM’s diminishing returns mean that ATK% is generally the more valuable artifact stat, especially given that Keqing’s supports often provide her with large amounts of EM. By contrast, in Quickbloom / Quickburn, the extra Transformative Reaction damage means that EM is far superior to ATK%, although the gap will narrow the more EM Keqing has.
In Quickbloom teams with Lauma, the value of EM skyrockets even further thanks to Lauma’s incredible buffs to Hyperbloom damage, and it can become competitive or even better than CRIT depending on the situation.
Keqing’s ER requirements are extremely low in most teams and should not need to be specifically built around.
Artifact Sets
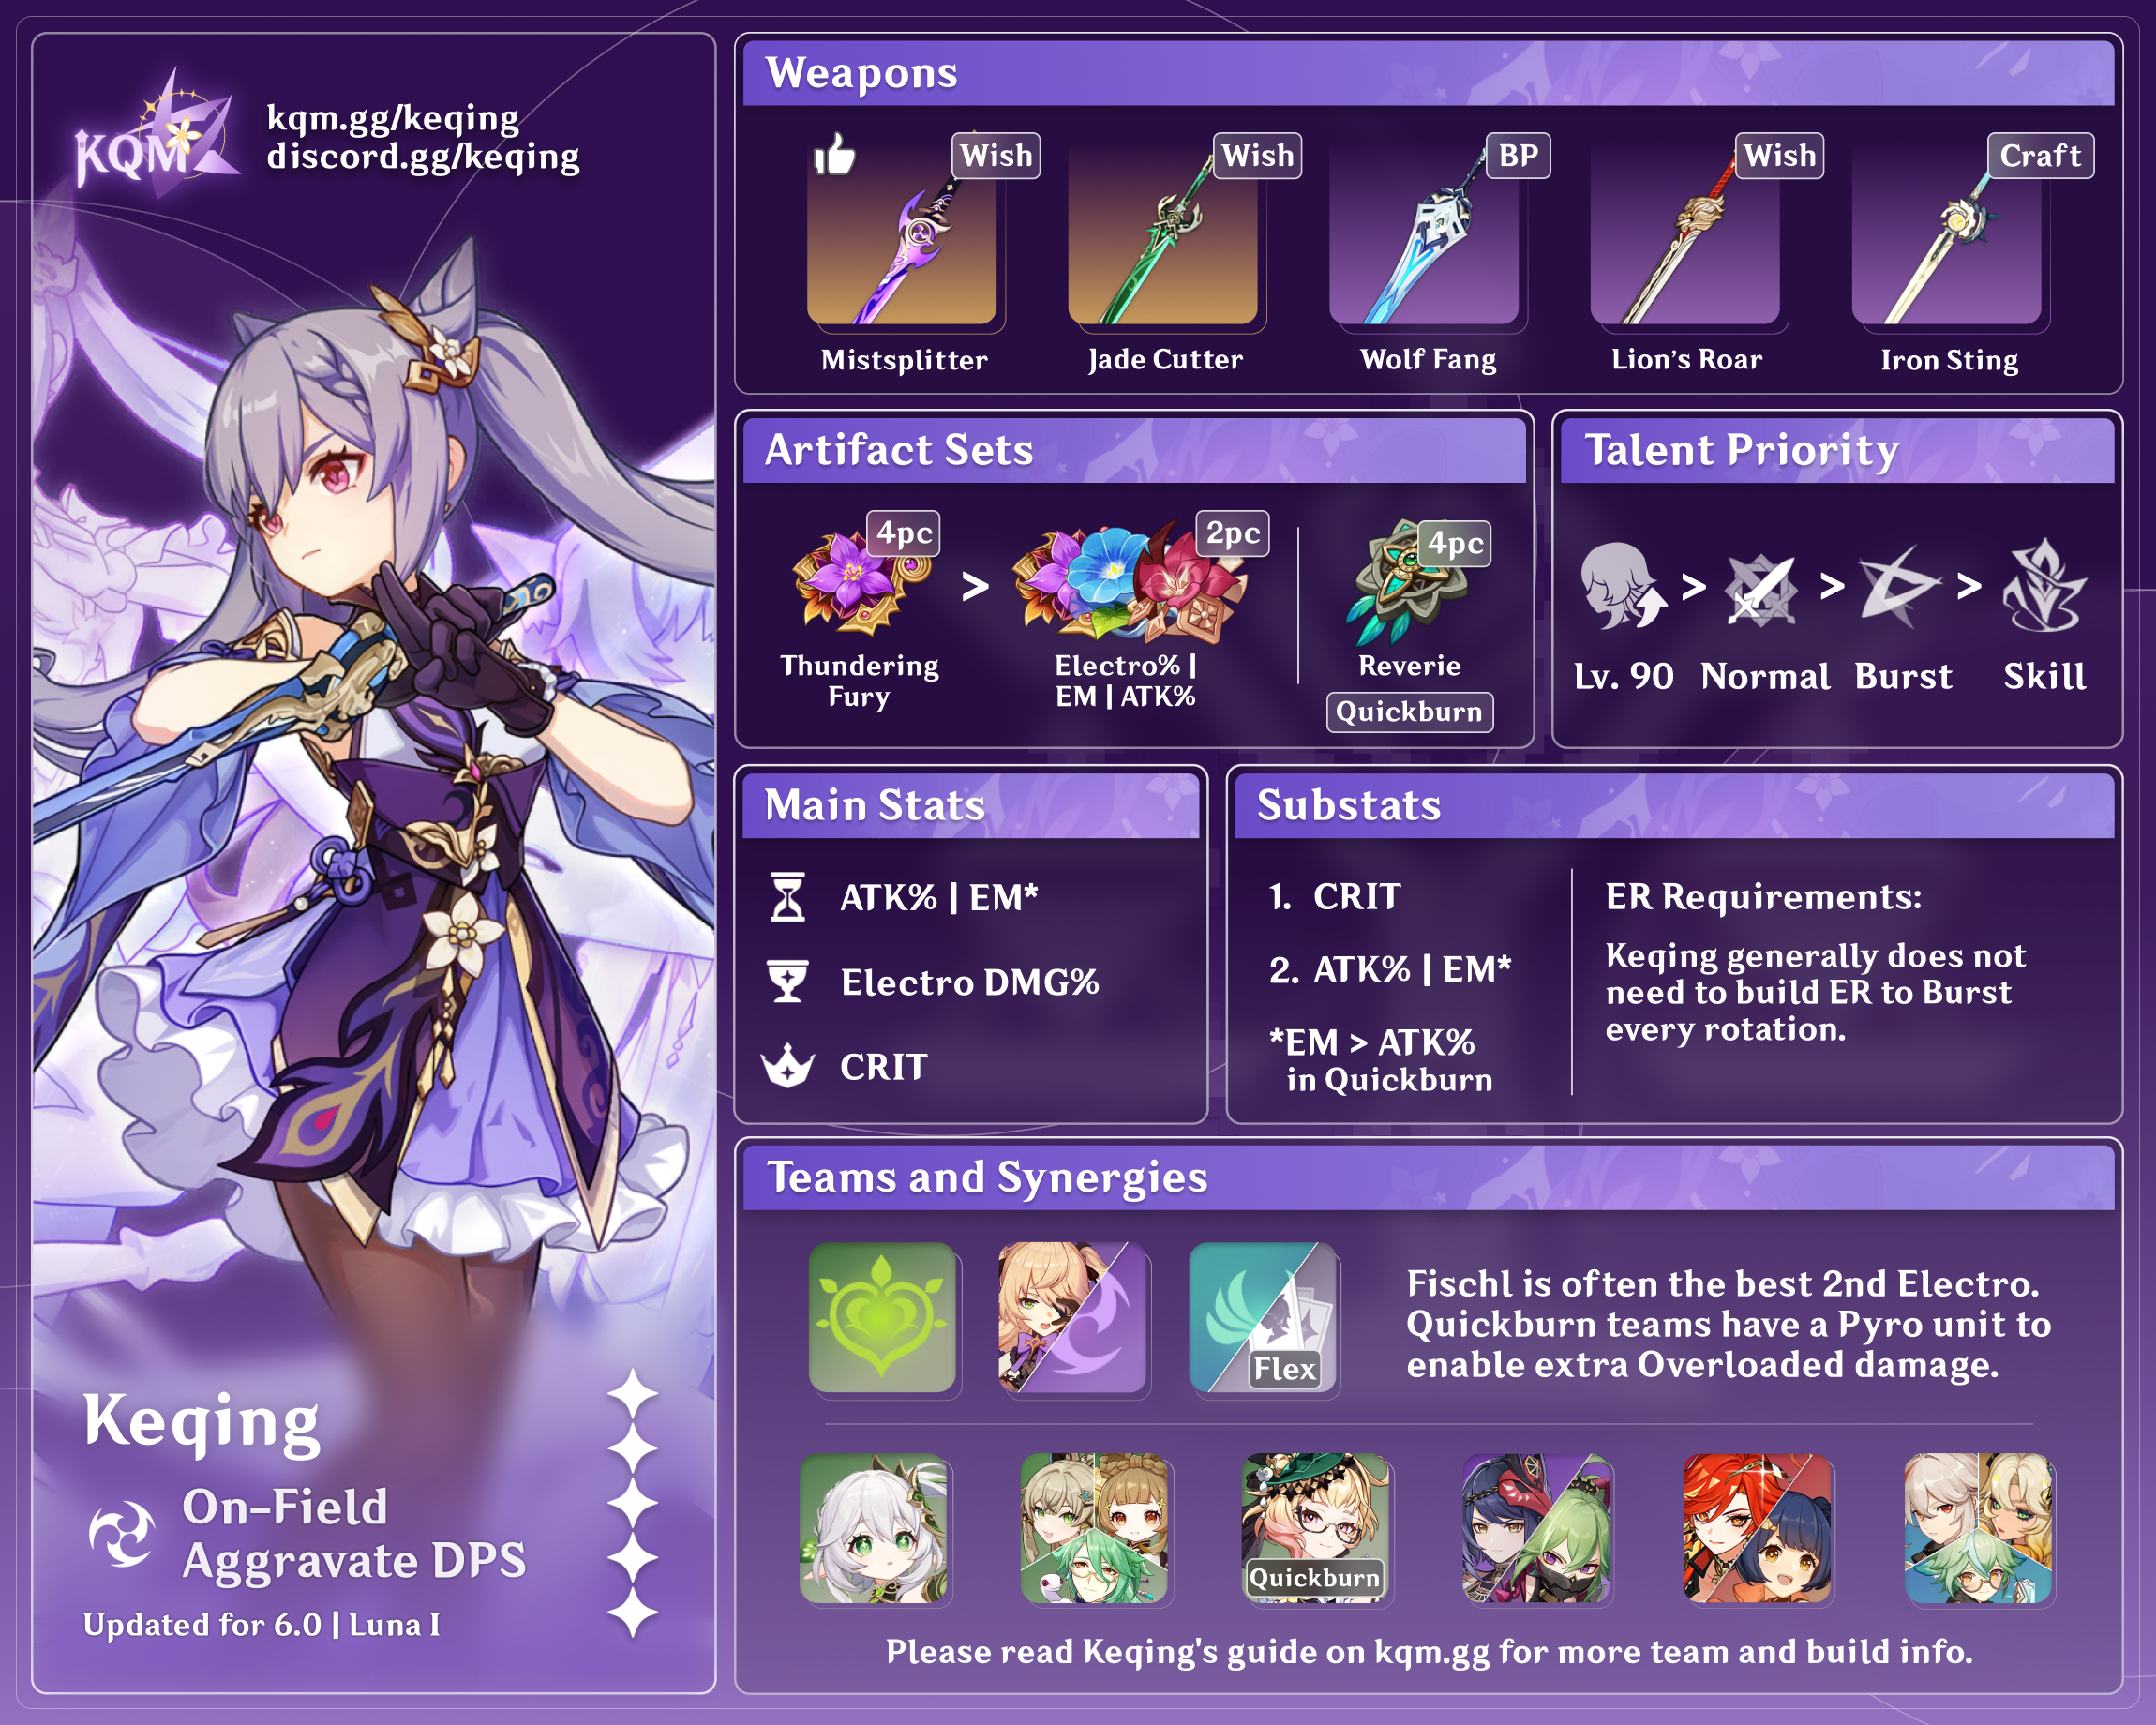
 4pc Thundering Fury (TF) | Keqing’s highest-damaging set in Quicken teams thanks to its Skill cooldown reduction effect allowing Keqing to cast another Skill for extra damage. Detonating the second Stiletto instead of teleporting onto it is mandatory for 4pc TF to outdamage other options. The extra particles can also help to decrease teammate ER requirements. Although 4TF is often touted for its flexibility, this tends to hold increasingly less true the more optimized your gameplay becomes. Nevertheless, the extra Skill cast can serve as a very useful bailout in emergencies or highly improvised scenarios. |
 4pc Gilded Dreams (GD) | Keqing appreciates both EM and ATK% in Quicken teams, making this a highly competitive artifact set in Aggravate. |
 4pc Thundersoother (TS) | Extremely competitive with 4pc Thundering Fury in Aggravate teams. Fares badly in teams with low Electro aura uptime. |
2pc TF + 2pc ATK% / EM / MH | 2pc mixed set options are reasonably competitive with Keqing’s top options in Aggravate. 2pc Marechaussee Hunter (MH) is the weakest of the options here but is close enough to win out given superior substats. 2pc combinations that do not have 2pc TF are quite noticeably behind other options and are generally not recommended unless you have exceptionally good substats on your pieces. |
 4pc Unfinished Reverie 4pc Marechaussee Hunter | Hyperspecific artifact sets that are Keqing’s best options in the right conditions: Reverie in Quickburn, MH with Furina. Nonfunctional outside of these cases, but very powerful in them, easily outclassing most other options. However, the conditions required to run these sets simultaneously increase the value of 4pc Thundering Fury, due to the presence of teammates with higher ER requirements (e.g. Furina) as well as the additional Elemental Reactions that Keqing is triggering. As such, even though these options are extremely powerful, 4TF is frequently a superior option and usually only slightly behind at worst. |
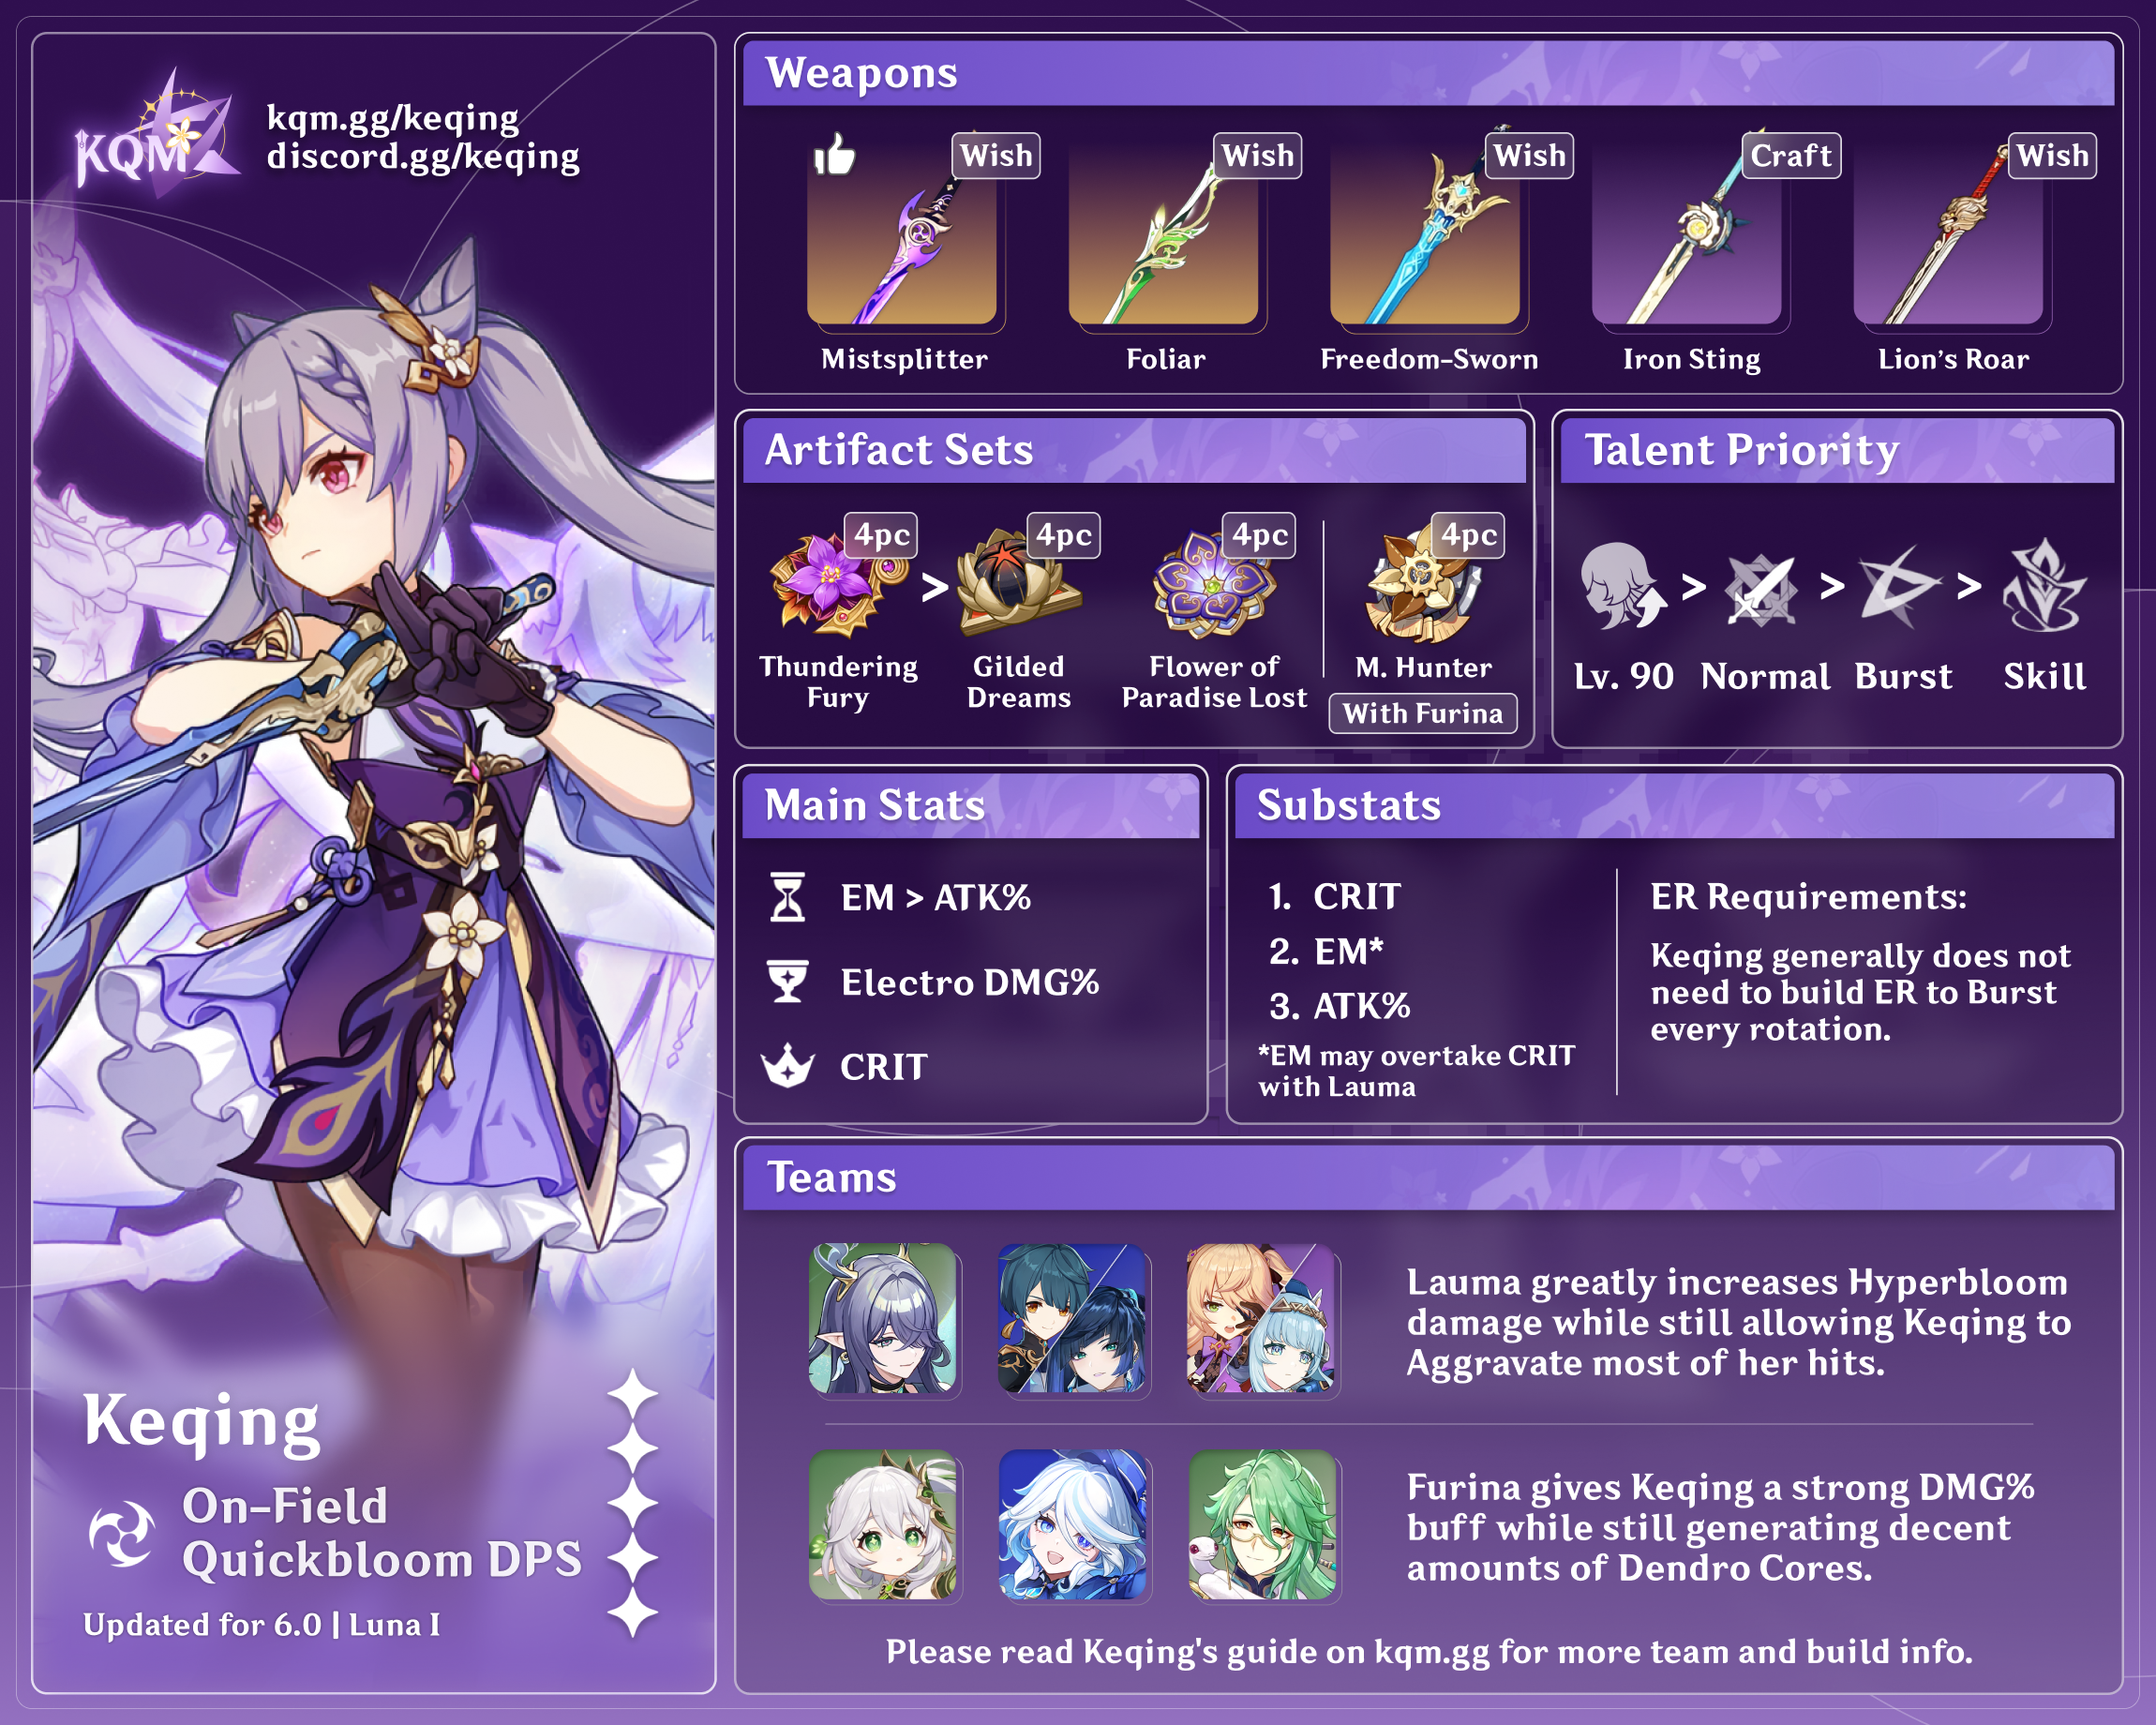
4pc Night of the Sky’s Unveiling (NotSU) | A powerful new artifact set for Keqing, but its usefulness in Dendro teams is currently limited to Quickbloom, as team comps with current Nod-Krai units must have Hydro. Note that the reaction damage bonus is quite useless for Keqing in this archetype, as she is not dealing any relevant amount of Lunar reaction damage. |
 4pc Flower of Paradise Lost (FoPL) | A theoretically excellent option in Lauma Quickbloom teams where Keqing is dealing a tremendous amount of Hyperbloom damage. However, in contrast to most typical users of this set who only care about building full EM, Keqing demands high CRIT value on her artifacts as well to maximize her talent damage. As such, it can be quite difficult to farm good FoPL pieces, and it is very unlikely that you will have a usable 4pc set lying around. |
Weapons
Ordered for Aggravate. In Quickbloom / Quickburn teams, EM main stat weapons will greatly overperform their usual rankings thanks to the presence of Transformative Reactions.
 5★ Mistsplitter Reforged | Thanks to its high Base ATK, CRIT DMG main stat, and powerful passive, Mistsplitter is generally Keqing’s best weapon across all archetypes. |
 5★ Haran Geppaku Futsu | Haran offers a large amount of CRIT Rate on top of a hefty chunk of DMG%. Keqing usually triggers Aggravate on all or almost all of her Normal Attacks, making Haran’s passive extremely valuable. |
 5★ Primordial Jade Cutter | As the highest–CRIT Rate main stat Sword in the game, combined with a strong and consistent passive, Jade Cutter is one of Keqing’s top options. Tends to overtake Haran when running 4TF, especially if you’re shortening your combos. |
 5★ Uraku Misugiri | Thanks to its high CRIT value and useful passive, Uraku is an excellent weapon for Keqing. Equal to Haran if running either 4TF or a Geo unit, and slightly better than Mistsplitter (!) if running both. |
 5★ Freedom-Sworn | The EM main stat and teamwide buff makes Freedom-Sworn a useful weapon for Keqing. Unfortunately, the passive usually only triggers every other combo. Note that the pull value of this weapon is decently helped by Kazuha being a good Keqing support. |
 5★ Light of Foliar Incision | A decent weapon with high CRIT DMG and an interesting quirk: thanks to the EM-scaling passive, Foliar compares increasingly favorably to other weapons the more EM Keqing has. This means that, similarly to EM main stat weapons, Foliar greatly overperforms its usual Aggravate ranking in Quickbloom / Quickburn teams. |
 Other 5★ CRIT Stat Sticks | Absolution, Splendor of Tranquil Waters, and Azurelight are all roughly equal to or only slightly better than R5 Lion’s Roar. Do not pull these weapons specifically for Keqing. Intentionally taking damage from enemies to stack Splendor’s passive is not a recommended strategy and only results in a small damage increase. If you’re playing Quickbloom and don’t have Key of Khaj-Nisut, put Splendor on Furina. |
 4★ Lion’s Roar | Keqing’s trademark 4-star option. Fares badly when its passive has low uptime, such as in some Quickbloom teams where Keqing is the only Electro unit. |
 4★ The Black Sword, Wolf-Fang | Battle Pass options. Assuming all weapons are at equal refinements, Wolf-Fang is slightly worse than Black Sword with non-TF artifact sets, but slightly better than Lion’s Roar when using 4TF. R1 Black Sword is usually better than R1 Lion’s Roar, but R5 Black Sword tends to perform worse than R5 Lion’s Roar. Overall, while the Battle Pass Swords are strong weapons, you should not buy the Battle Pass specifically to obtain them for Keqing. |
 4★ Calamity of Eshu, 5★ Summit Shaper | Weapons with passives that require a shield. Eshu is ever so slightly better than R5 Lion’s Roar in absolutely perfect conditions, but is usually worse in practice. |
 3★ Harbinger of Dawn | Ceases to be a competitive option if you cannot keep the passive active. Note that this weapon’s low Base ATK makes it noticeably favor an EM Sands. |
 4★ Toukabou Shigure, Iron Sting | Strong EM main stat weapons that serve as Keqing’s “F2P” baseline in Quickbloom / Quickburn. Solid options in Aggravate, but nothing special. Shigure’s passive only triggers every other Keqing combo outside of multiwave. |
4★ Moonweaver’s Dawn | A new weapon that provides Keqing with a large amount of DMG% on her Burst, making it a fairly playable option if you have little better. A free copy of this weapon is available in Nod-Krai. |
 4★ Finale of the Deep | A craftable option that requires a healer to trigger the full passive. Given its flexibility as a weapon for several different on-field DPS units, Finale is more billet-efficient to refine than Iron Sting. With a healer, Finale also enables 4pc Fragment of Harmonic Whimsy, although Finale is simply not a good enough weapon in Quicken to make this combo a seriously enthralling option. |
 4★ Kagotsurube Isshin | Free option from Kazuha’s Story Quest. Use only if you have absolutely nothing better. |
Rotation Notation
- N = Normal Attack
- C = Charged Attack
- A = Aimed Shot
- P = Plunging Attack
- E = Elemental Skill
- tE = Tap Skill
- hE = Hold Skill
- Q = Elemental Burst
- D = dash (cancel)
- J = jump (cancel)
- W = walk (cancel)
- > = switch character
- ( ) = “these actions are optional; please refer to the notes below”
- [ ] = “repeat these actions the specified number of times”
Aggravate

Keqing’s most natural and synergistic archetype. Her multihit, rapid attacks are ideal for triggering many Aggravates over the course of a rotation, and her field time usually syncs exceptionally well with her Aggravate teammates.
Notable Teammates
 Fischl | Fischl is Keqing’s most important Aggravate teammate and synergizes exceptionally well with both her and the archetype as a whole. Keqing drives Fischl’s A4 and C6 while on-field, skyrocketing Fischl’s personal damage. While Fischl’s 25s Skill cooldown is usually a nuisance to most DPS units, Keqing welcomes 25s rotations as they allow her enough time to Burst twice per rotation. The only remotely comparable replacement to Fischl is C6 Sara, but due to Fischl’s extremely high personal damage and Keqing’s relatively low motion values compared to other Electro on-fielders, Fischl remains Keqing’s most prominent Electro teammate. |
Electro
Electro teammates take advantage of Aggravate and can provide either buffs, small amounts of sustain, or exceptional personal damage.


Dendro
Dendro units enable Quicken and typically provide either team buffs or defensive utility. Quicken’s long duration means that fairly little Dendro application is needed to sustain full uptime. Nahida is not outrageously ahead of other Dendro options in terms of team damage until she hits C2. Emilie is most notable in Quickburn teams.


Anemo
Anemo units hold 4pc Viridescent Venerer to shred Electro RES, and some can provide grouping abilities that are highly valuable in AoE. Kazuha and Sucrose are easily the strongest options for offensive buffs.


Flex
Flex units provide team buffing or other similar value without interfering with the Quicken aura. Xilonen is a particularly appealing option — her buffs are competitive with Kazuha and Sucrose, and she provides strong healing to boot.
When using Pyro flex units, Quicken and Burning will coexist, leading to “Quickburn” team comps where Keqing triggers both Aggravate and Overload. These teams also turn Emilie into a much stronger Dendro option than usual. Note that Pyro units usually favor full EM builds over CRIT here as they can have some Overload ownership, and their Talent damage is typically completely unbuffed.


Example Teams
This is not a comprehensive list of teams. The inclusion or exclusion of any given team does not necessarily reflect its power level.

Keqing’s traditional premium Aggravate team. Has excellent damage, but can be somewhat difficult to play, especially given the lack of sustain. Prototype Amber can be used on Nahida if survivability is a large concern.
This team arguably has the most flexible rotations of any Keqing team. Understand that the rotation samples given below are exceptionally flexible even by typical Keqing standards, and that the best rotation in any given situation will often be something specifically customized against the enemy lineup.
Sample Rotation 1 (Requires C6 Fischl for Swirl Setup)
(Keqing E)¹ > Kazuha tEP > Nahida E Q > Fischl E N1² > Kazuha tEP > Keqing combo > Kazuha Q > Fischl Q > Kazuha tEP > (Nahida E)³ > Keqing combo
Sample Rotation 2
(Keqing E)¹ > Nahida Q > Kazuha tEP Q > Nahida E > Fischl E > Keqing combo > (Nahida E)³ > Fischl Q > Kazuha tEP > Keqing combo
¹First rotation only.
²Fischl procs her C6 with Normal Attacks until Electro aura is established.
³Often required in multiwave to re-mark new enemies.

Xilonen lacks Kazuha’s grouping and AoE damage, but compensates with effortless full uptime on her buffs and strong healing. Rotations are slightly inflexible but fairly easy to perform. Xilonen uses Burst as necessary. With C2 Xilonen, Fischl can start the first rotation with her Skill and replace all following Skill uses with Burst.
Sample Rotation
(Fischl C)¹ > Xilonen E N2 > Nahida E Q > Fischl E > Keqing combo > Xilonen E(Q) N2 > (Nahida E)² > Fischl Q > Keqing combo
¹First rotation only. Can be replaced with Keqing E C if you need particles.
²Often required in multiwave to re-mark new enemies.

A non-Fischl option. C6 Sara compares somewhat unfavorably to Fischl in single-target but begins to even out with higher investment on Keqing and in higher-health AoE. Due to the team’s poor particle generation, 4TF is extremely desired to keep ER requirements low. Xilonen uses Burst as necessary.
Sample Rotation
(Sara E CA)¹ > Xilonen E(Q) N2 > Nahida E Q > Sara (E CA)² Q > Keqing combo > Xilonen E N2 > (Nahida E)³ > Sara E CA > Keqing combo
¹First rotation only.
²Subsequent rotations only.
³Often required in multiwave to re-mark new enemies.

One of Keqing’s typical 4-star–only teams. Kirara and especially Sucrose are pleasantly competitive with 5-star supports. Kirara going before Sucrose in the rotation would improve buff uptime, but this requires either a tap E (and thus a weaker shield) or intentionally missing the first hit of Kirara’s short hold E, which can be difficult if the enemy is in melee range.
Sample Rotation
Fischl E > Sucrose E > Kirara shE > Keqing combo > Fischl Q > Sucrose ED Q > Kirara shE > Keqing combo

An excellent option against content that requires Pyro units. This particular Quickburn team has some survivability issues against groups of enemies thanks to Burning self-damage and a lack of sustain. Prototype Amber Nahida is a viable solution, but will lead to a slight drop in team DPS. Against larger enemies (e.g. Lava Dragon Statue), you will not take Burning self-damage and the team is notably safer.
Sample Rotation
Nahida E Q > Xiangling Q ED > Fischl Q > Keqing EQE 5[N1C] EE N1C N1 > (Nahida E)² > Xiangling ED > Fischl E > Keqing Q EE 4[N1C]¹
¹If 4TF, perform EQE 2[N1C] N1 E N1C instead.
²Often required in multiwave to re-mark new enemies.
Quickbloom/Hyperbloom

When both Dendro and Hydro units are on the team, Keqing can trigger both Aggravate and Hyperbloom. High Dendro application and low Hydro application creates “Quickbloom” teams, where Keqing enjoys high Quicken aura uptime and still triggers a decent amount of Hyperblooms. The last slot is usually either a unit that provides significant offensive value, or a healer if one is using Furina.
Lauma’s release has both drastically strengthened this archetype and placed a great emphasis on Hyperbloom damage and Bloom core production. This often causes Keqing’s Hyperbloom damage to overtake her talent damage, where Keqing triggers many Hyperblooms and EM becomes a more valuable stat than CRIT, even when there is high Quicken aura uptime.
These teams deal very high damage, and Keqing’s talent damage is still valuable enough to be of notable importance. Still, her role is highly contested by off-field triggers, who allow a Dendro Catalyst driver to onfield and increase core generation.
Notable Teammates
Lauma | Lauma is a new and extremely powerful Bloom support who offers respectable off-field Dendro application, Dendro and Hydro RES shred, a large increase to Hyperbloom damage, and even allows Hyperblooms to crit at a fixed value if she is solo Nod-Krai. At C1, she can even heal and thus is able to stack Furina’s Fanfare. |
Other Dendro
These Dendro units provide a variety of Elemental application, team buffs, and sustain. Nahida’s Dendro application is notably greater than other options, which may lead to particularly high Quicken aura uptime.


Hydro
These Hydro units provide a variety of considerable offensive buffs, utility, and personal damage. Xingqiu and Yelan have notably higher rates of application than Furina and as such will make Keqing trigger more Hyperblooms and less Aggravates. Furina scales significantly better with vertical investment than other options.


Electro
Offensively-oriented Electro units contribute either via personal damage or strong buffs. Some may steal a modest amount of Hyperbloom ownership. Units with high Electro application may help to stabilize Quicken aura (or simply generate more Dendro Cores for Hyperbloom) depending on the team.
Ineffa is an extremely attractive option in teams where Lunar-Charged procs frequently enough to maintain full thundercloud uptime. However, teams with high Dendro application and low Hydro application can make it difficult for Lunar-Charged to trigger, which can greatly hamper Ineffa’s performance in the wrong circumstances.


Healers
Healers that stack Furina’s Fanfare. Their secondary benefits can range between Elemental Resonance, support weapons, extra Elemental application, and offensive buffs.
Hydro healers (particularly Kokomi) will lower Quicken aura uptime and skew Keqing’s damage toward Hyperbloom. By contrast, Kuki will steal most of Keqing’s Hyperbloom ownership, but she increases Quicken aura uptime and thus enables more Aggravates.


Example Teams
This is not a comprehensive list of teams. The inclusion or exclusion of any given team does not necessarily reflect its power level.

A Quickbloom team with Nod-Krai units. Ineffa unfortunately disables Lauma’s Hyperbloom crits by raising the team’s Moonsign level to Ascendant Gleam, but she offers Keqing access to 4pc Night of the Sky’s Unveiling along with a sturdy shield that becomes even more durable thanks to Xingqiu’s rainsword damage reduction. The dominant aura of this team is Quicken, but Xingqiu’s application is strong enough to sneak in a few momentary Lunar-Charged procs so that Ineffa loses minimal thundercloud uptime.
Sample Rotation (Non-TF)
Ineffa E Q > Xingqiu EDQ N1 > Lauma N1 Q hE > Keqing E N1 Q E 5[N1C] (N1) EE 3[N1C] N1
Sample Rotation (4pc TF)
Ineffa E Q > Xingqiu EDQ N1 > Lauma N1 Q hE > Keqing E N1 Q E 3[N1C] N1 EE 3[N1C] N1 E N1C

A very safe team with good single-target damage. Baizhu offers teamwide healing, small shields, Dendro Resonance, and a slight buff to both Aggravate and Hyperbloom damage. Keqing only casts Burst once per rotation due to cooldown constraints, which may make the second 4TF combo quite awkward or inconsistent due to Skill cooldown concerns.
Sample Rotation (Non-TF Keqing)
Furina ED Q > Nahida E Q > Baizhu E Q > Keqing EQE 5[N1C] > (Nahida E)¹ > Baizhu E > Keqing EE 5[N1C]
Sample Rotation (4TF Keqing)
Furina ED Q > Nahida E Q > Baizhu E Q > Keqing EQE N1C N1 E 3[N1C] > (Nahida E)¹ > Baizhu E > Keqing EE 3[N1C] N1(C)² E N1C
¹Often required in multiwave to re-mark new enemies.
²Makes the combo more fluid, but runs the risk of losing full Infusion uptime.

A high-damaging but very risky team. The only source of teamwide healing is Prototype Amber Nahida, but this is not enough healing to counterbalance Furina’s drain, so your team members will be constantly hovering at around 50% HP. This team has little margin for error, as getting hit and dropping below 50% HP will greatly lower the team’s already middling Fanfare generation, not to mention the challenge of simply surviving. You cannot even use Ineffa for her shield instead of Fischl without risking a severe DPS loss, as Lunar-Charged thundercloud uptime in single-target would be exceedingly low.
However, if you happen to have C6 Furina, the team can easily and safely generate maximum Fanfare and suddenly becomes an incredibly powerful and appealing option. (Note that the “Elemental Bursts instantly restore 30% HP” card in the Spiral Abyss can also serve as a satisfactory source of healing if you luck into it.)
Sample Rotation (Non-TF Keqing)
Furina ED Q (N2)¹ > Fischl E > Nahida E Q > Keqing EQE 5[N1C] E > Fischl Q > Nahida E N1 > Keqing E² N1 Q N1C N1 E N1C
Sample Rotation (4TF Keqing)
Furina ED Q (N2)¹ > Fischl E > Nahida E Q > Keqing combo > Fischl Q > Nahida E N2(C) > Keqing combo
¹Only if Furina is C6.
²Because Stiletto was cast at the end of Keqing’s first combo, this is a teleport!

Lauma is a very logical and powerful upgrade to Nahida in this classic high-risk, high-reward team. She offers incredible buffs to Hyperbloom damage along with Hydro RES shred for Furina, and her Dendro application is still strong enough to maintain permanent Quicken aura when paired with Furina. As a Catalyst user, she can hold Prototype Amber to stack Fanfare the same way that Nahida can, but she also has potent healing on her C1 to stack Fanfare much more effectively and keep the team’s health high, which is a far more accessible sustain option than Furina’s C6.
Sample Rotation
Furina ED Q > Lauma N1 Q hE > Fischl E > Keqing EQE 5[N1C] EE 2[N1C] > Lauma hE > Fischl Q > Keqing Q EE 2[N1C] N1

A team with far more Hydro application than Dendro application, meaning that Keqing triggers a great number of Hyperblooms and very few Aggravates. Furina and Yelan lower each other’s ER requirements and unlock Hydro Resonance to enhance their considerable personal damage. Keqing’s combos are built around proccing as many waves of Yelan’s Burst as possible.
Sample Rotation
Furina ED Q > Baizhu E Q > Yelan E Q N1 > Keqing E N1 E 4[N1C] N1 Q > Yelan N1 E N1 > Keqing E N1 E 5[N1C]¹
¹Switch out whenever Yelan’s Burst ends. 4TF can perform 3[N1C] N1 E N1C if desired.
Overload
Artifact Stats
Sands | Goblet | Circlet |
| ATK% | Electro DMG% | CRIT |
Stat Priority: CRIT > ATK%
Although CRIT is still easily above ATK%, the difference is notably smaller than in Keqing’s Dendro teams.
Keqing’s ER requirements are extremely low and should not need to be specifically built around.
Artifact Sets
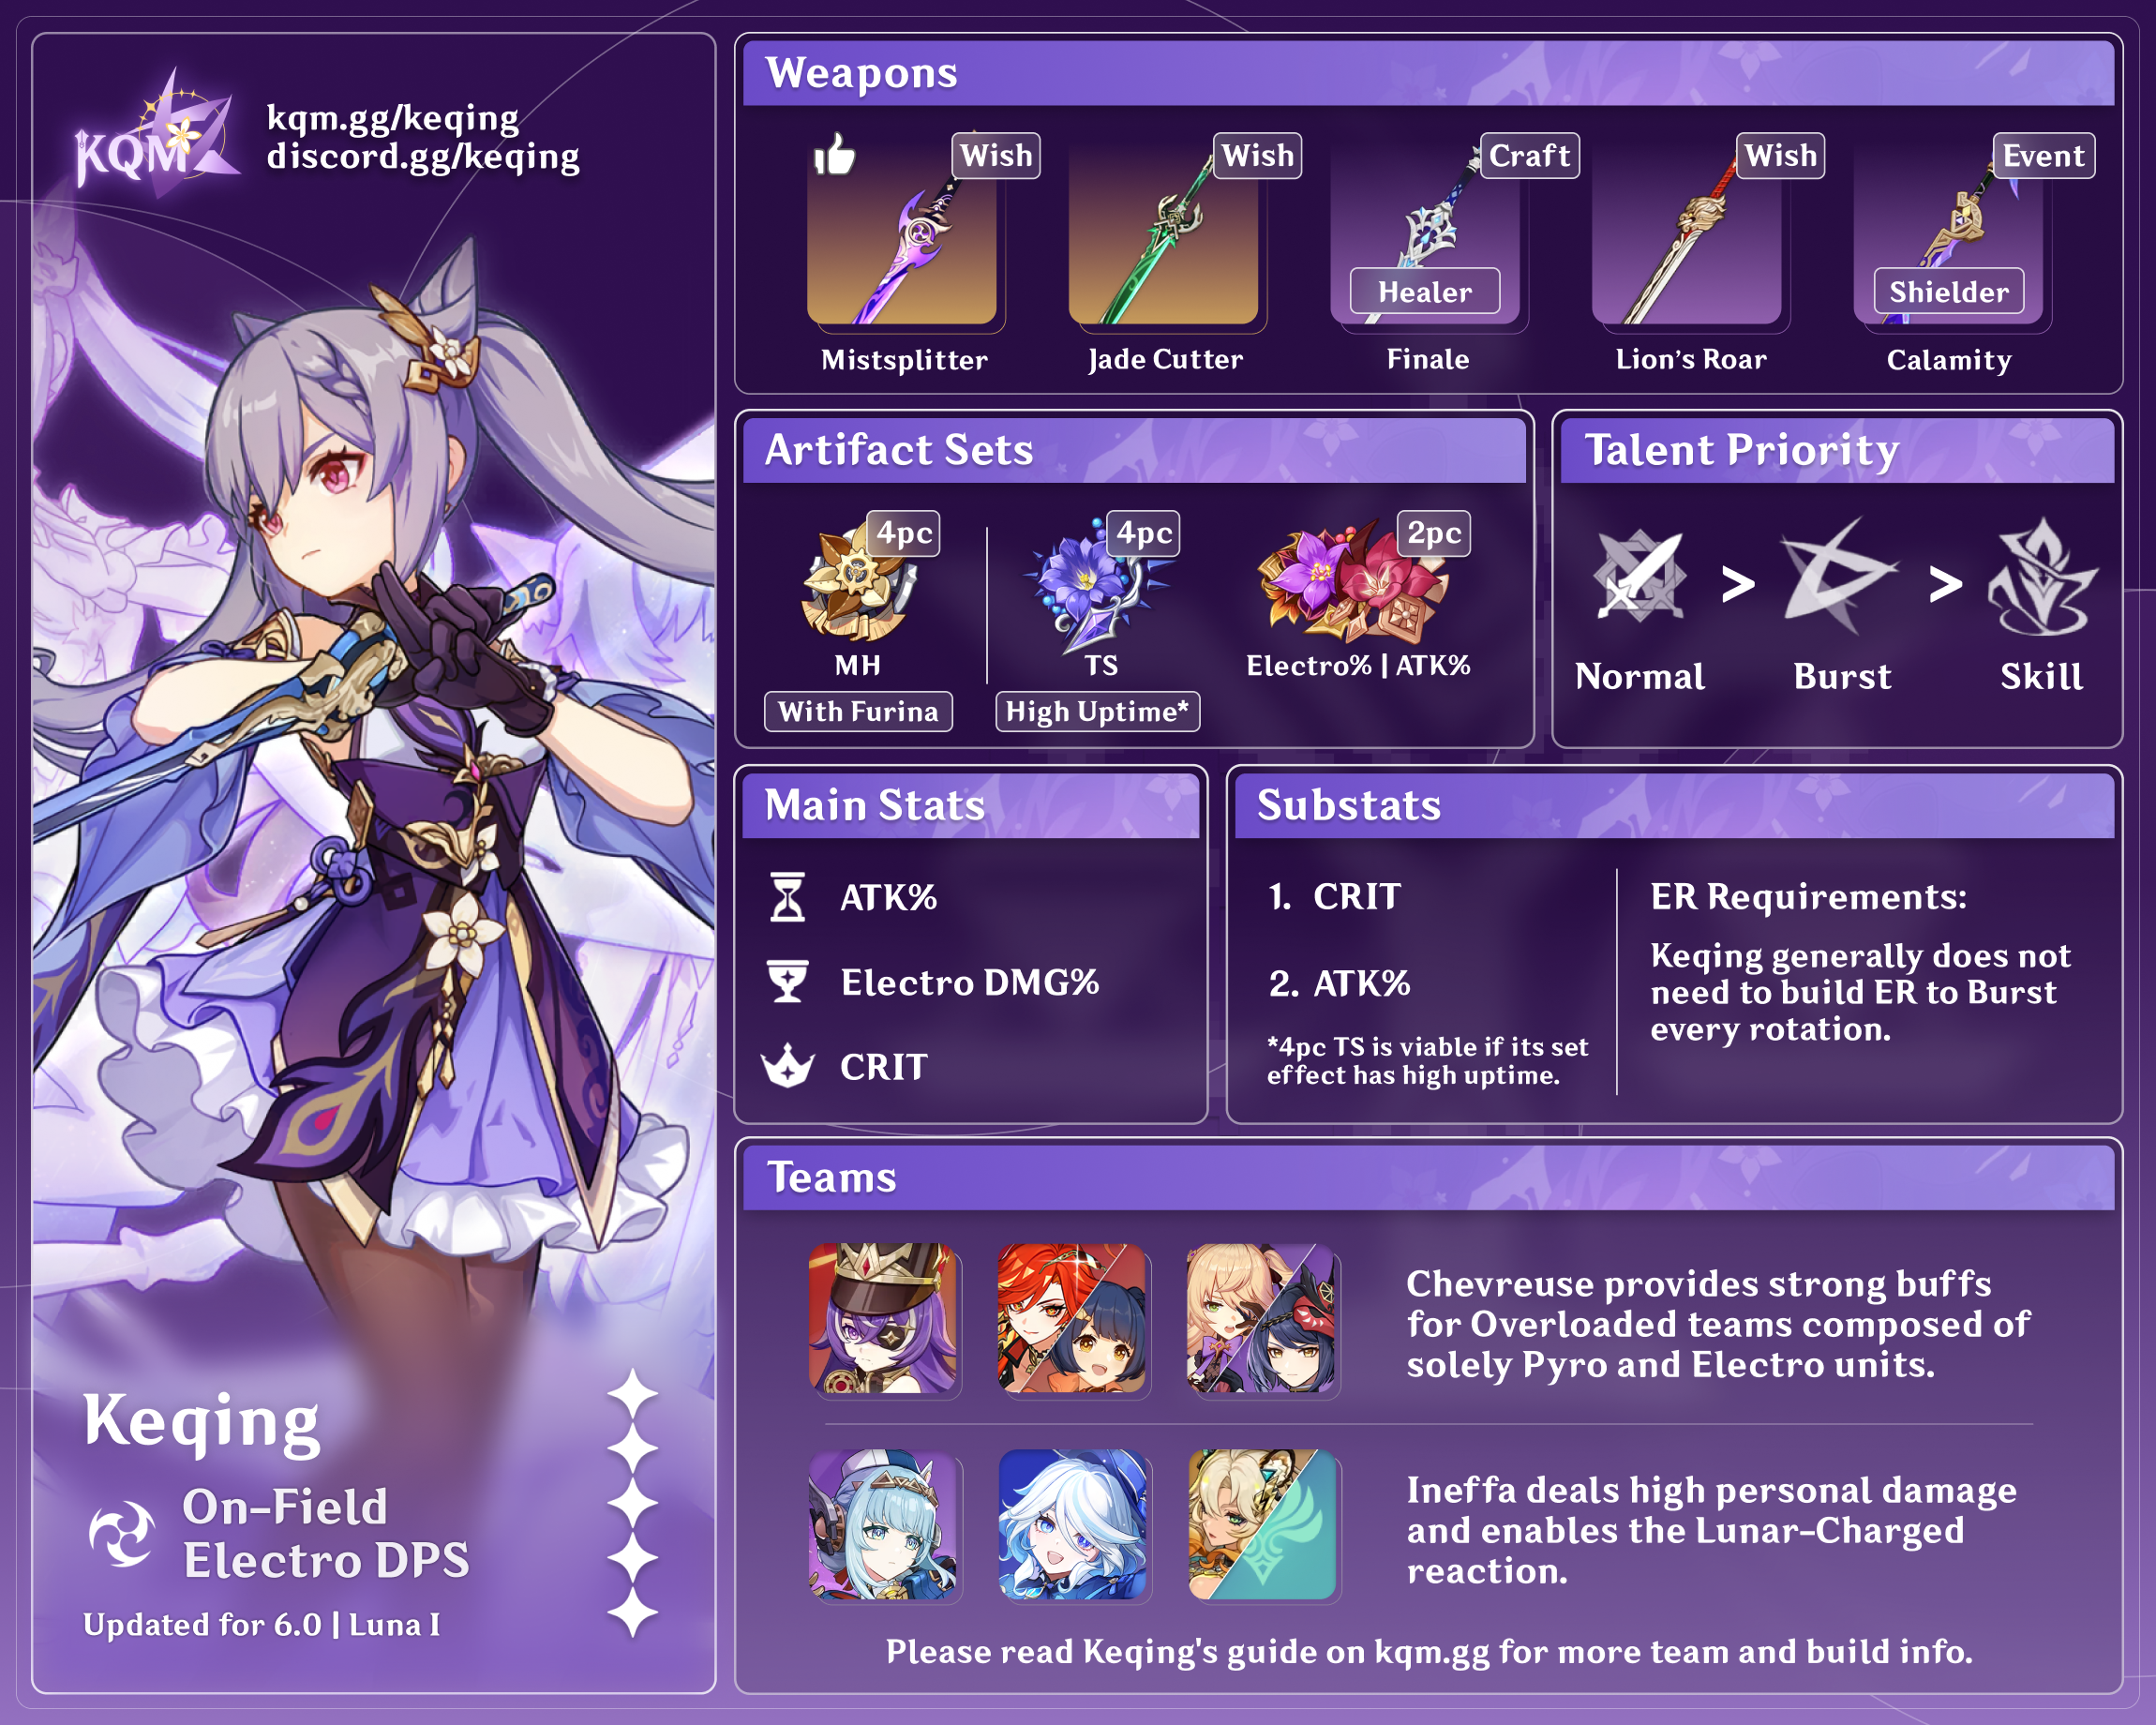
4pc Thundering Fury is not a recommended option for Keqing in Overload.
 2pc Thundering Fury + 2pc ATK% / MH | 2pc mixed set options are Keqing’s go-to options in Overload. 2pc MH is the weakest of the options here but is close enough to win out if the substats are exceptional. 2pc combinations that do not have 2pc TF are noticeably behind other options, although the gap narrows sharply if Keqing is using weapons with high amounts of DMG%. |
4pc Thundersoother | Electro aura uptime is not excellent in Overload and may vary from team to team, but it is generally good enough to make Thundersoother a solidly competitive option. Usually falls a couple percent behind 2pc TF + 2pc ATK%. |
 4pc Fragment of Harmonic Whimsy | Whimsy is a stunningly powerful option in Overload, especially when compared to other fairly underwhelming competitors, but it requires the usage of both Finale of the Deep and a healer to function. Thankfully, Chevreuse is both a healer and Keqing’s most important Overload teammate. |
Weapons
5★ Mistsplitter Reforged | Thanks to its high Base ATK, CRIT DMG main stat, and powerful passive, Mistsplitter is generally Keqing’s best weapon across all archetypes. |
5★ Primordial Jade Cutter | Jade Cutter is as reliable as ever, arriving at a comfortable #2 spot in Overload thanks to its high CRIT and pleasantly strong passive. |
4★ Finale of the Deep (With 4pc Fragment of Harmonic Whimsy) | Seriously? Yes! Finale of the Deep creates a Bond of Life when Keqing casts an Elemental Skill, allowing Keqing to take advantage of the exceedingly powerful 4pc Whimsy. In Overload, this combo can perform on par or slightly better than Primordial Jade Cutter + 2pc TF–2pc ATK% or 4TS. However, “on par with Jade Cutter” comes with a heavy list of caveats, as there are various possible difficulties in stacking the 4pc Whimsy passive. Chevreuse must be at least C4 if Keqing is casting Burst twice a rotation, otherwise half of Keqing’s combos will only have one stack. Keqing never fully stacks Whimsy on her first combo of a combat, so its performance falters the less rotations you take to clear. Finally, if extending Keqing’s combo beyond her basic EQE 5[N1C], Whimsy stacks will fall off entirely for the rest of the combo. Even so, in Overload, this weapon + artifact combo is a lethal option for Keqing. Even in the worst-case scenarios, it usually ends up falling equal to or only slightly behind Absolution. |
 5★ Azurelight, Haran Geppaku Futsu | These weapons are virtually tied in Overload — Haran is still one of Keqing’s top weapons, but Keqing’s Normal Attacks are a much less important part of her damage splits in the absence of Aggravate, making Haran sit firmly behind Mist and Jade. Conversely, Azurelight’s Energy-conditional passive is still almost entirely useless for Keqing, but its high Base ATK and decent bundle of stats make it an excellent option regardless. |
 5★ Absolution | Absolution becomes a solid choice for Keqing in Overload thanks to lessened competition and the increased value of ATK. You still should not pull this weapon specifically for Keqing. |
 5★ Light of Foliar Incision, Uraku Misugiri | CRIT DMG stat sticks with relatively weak passives. Between the lack of Geo teammates, nonviability of 4TF, and decreased Normal Attack / Skill damage, Uraku performs much worse in Overload than it does in Quicken. |
 5★ Summit Shaper, Splendor of Tranquil Waters | Slightly better than 4-star options. Unfortunately for Summit Shaper, Keqing does not usually run with shielders in Overload. |
4★ Finale of the Deep (Without Whimsy) | There is no good reason not to use Whimsy with Finale — even in the worst of circumstances, it easily outperforms mixed 2pc sets. That being said, even if you don’t have a Whimsy set lying around, Finale is still Keqing’s best 4-star option. |
4★ The Black Sword, Wolf-Fang | Battle Pass options outperform Lion’s Roar at equal refinements. Black Sword is usually better than Wolf-Fang, as Keqing’s damage splits shift away from her Elemental Skill outside of Dendro. |
4★ Lion’s Roar | Keqing’s old reliable. Lessened Electro aura uptime barely damages the performance of Lion’s Roar in Overload, as its passive works on enemies affected by Pyro as well. |
5★ Freedom-Sworn | EM main stat weapons are largely noncompetitive in Overload, and Keqing struggles to activate this weapon’s passive until late into her first rotation. Even so, the high Base ATK of this weapon is quite valuable, and its teamwide buff can put it roughly equal to R5 Lion’s Roar when it comes to team DPS. |
4★ Moonweaver’s Dawn | A new weapon that provides Keqing with a large amount of DMG% on her Burst, making it a fairly playable option if you have little better. A free copy of this weapon is available in Nod-Krai. |
4★ Kagotsurube Isshin | Kazuha’s Story Quest weapon. A fairly decent option if you have nothing better. |
3★ Harbinger of Dawn | HoD’s low Base ATK hurts its performance outside of Dendro. Completely noncompetitive if you cannot maintain the passive. |
Rotation Notation
- N = Normal Attack
- C = Charged Attack
- A = Aimed Shot
- P = Plunging Attack
- E = Elemental Skill
- tE = Tap Skill
- hE = Hold Skill
- Q = Elemental Burst
- D = dash (cancel)
- J = jump (cancel)
- W = walk (cancel)
- > = switch character
- ( ) = “these actions are optional; please refer to the notes below”
- [ ] = “repeat these actions the specified number of times”
Teams

Keqing’s synergy with non-Dendro archetypes is somewhat limited. Aggravate supports her damage thanks to her multihit attacks, but her relatively low motion values are somewhat apparent in the absence of Dendro units. As such, Keqing compares rather unfavorably to other Electro 5-star DPS units outside of Quicken.
Nevertheless, other options exist. Overload in particular is well worth discussing, as Keqing greatly benefits from the raw buffing power of Chevreuse, particularly if Chevreuse is C6. Overload also provides a way for Keqing to pair with Pyro units without having to reckon with Burning self-damage.
Note that the combination of knockback between Overload and Keqing’s Charged Attacks makes fighting light enemies incredibly difficult. On the flip side, this archetype enjoys uniquely excellent performance against enemies with innate Hydro auras.
Notable Teammates
 Chevreuse | Chevreuse is the key to Overload Keqing as an archetype. Her Ascension 1 Passive offers crucial Electro and Pyro RES Shred as long as there are no other Elements on the team, and her A4 offers a sizable ATK% buff. Her already high value is supercharged at C6, which offers a massive DMG% buff to the team. The strength of these raw numbers makes her Keqing’s most important Overload teammate. Note that Chevreuse is quite reliant on her Constellations: she rotates quite awkwardly in some Keqing teams before C4 due to her mildly unpleasant 15s Skill cooldown, and her C6 is an extremely powerful damage spike. However, even at C0, she is still the core component of Keqing’s Overload teams. |
Pyro
Pyro units provide off-field application to keep uptime on Chevreuse’s A1 Passive. Each option has slightly unique positives and negatives that make it worthwhile to explore them in individual detail.
Xiangling | Xiangling has the highest application of any Pyro off-fielder, which makes her excellent against content that requires Pyro units. As in Quickburn, an EM Xiangling build is advised in most compositions, as she is the dominant Overload trigger in her teams. However, because Xiangling’s Burst has a 20s CD and costs 80 Energy, she forces longer rotations than most other options. This may seem like a strict downside at first, but these long rotations also have the benefit of syncing nicely with units like Fischl. They also give Keqing enough time to perform two full combos. |
Mavuika | Mavuika has two separate roles depending on the team composition. If she is the only Natlan unit on the team, she runs 4pc Scroll of the Hero of Cinder City and builds full EM, Bursting as available (which tends to be every 2–3 rotations). In this role, she does less personal damage than Xiangling but compensates by buffing Keqing through 4pc Scroll and her occasional DMG% buff from Burst. However, if there is another Natlan support (e.g. Ororon) on the team, Mavuika’s playstyle dramatically shifts. As the other Natlan unit can run 4pc Scroll and charge Mavuika’s Fighting Spirit, Mavuika switches to 4pc Obsidian Codex and builds full DPS, Bursting every rotation. Mavuika can also take some field time so that Keqing does not have to extend her on-field combo to uncomfortably long lengths. |
 Pyro Traveler | Pyro Main Character (PMC) is essentially a free version of Mavuika with drastically lower Talent damage and a lower DMG% buff. PMC plays a roughly identical role to Mavuika when there are no other Natlan units on the team and generally serves as an acceptable replacement. Unfortunately, instead of benefiting from other Natlan supports, PMC would prefer to be the only unit that can enter Nightsoul’s Blessing on the team, as the DMG% buff from 4pc Scroll does not stack and PMC does not deal enough Talent damage to justify running Obsidian Codex in the same fashion as Mavuika. |
 Bennett | Bennett does not apply off-field Pyro but is a worthwhile consideration as a third Pyro slot, as he is a strong buffer who fits within Chevreuse’s Element restriction. Bennett can also potentially be run in Double Electro + Double Pyro teams, as C6 Bennett can circumvent Chevreuse’s off-field application requirement by infusing Keqing’s Normal and Charged Attacks with Pyro. However, this carries the obvious downside of forcing Keqing to split her damage between two Elements, which can turn slightly catastrophic when using large buffs to Electro damage like Keqing’s C6, 4pc Thundersoother, or C6 Sara. |
Electro
Offensively-oriented Electro units contribute either via personal damage or strong buffs. Ororon essentially must be paired with a second Natlan unit (preferably Mavuika) to activate 4pc Scroll given the lack of Hydro teammates.

Example Teams
This is not a comprehensive list of teams. The inclusion or exclusion of any given team does not necessarily reflect its power level.

A strong Overload team with classic off-field damage dealers in Xiangling and Fischl. The long rotation time makes Xiangling’s ER requirements exceedingly manageable.
Sample Rotation
(Keqing E)¹ > Chevreuse Q hE > Fischl E > Xiangling E > Keqing Q EE² 5[N1C] > Chevreuse (hE)³ > Fischl Q > Xiangling Q E > Keqing EQE 5[N1C]
¹First rotation only.
²EQE is also possible from second rotation onward.
³Skip if Chevreuse is under C4.

An Overload team with Nightsoul units. Ororon and Mavuika mutually benefit one another: Mavuika allows Ororon to enter the Nightsoul’s Blessing state and trigger 4pc Scroll, and Ororon generates enough Fighting Spirit for Mavuika to Burst every rotation.
Sample Rotation
Ororon E Q > Chevreuse Q hE > Mavuika E Q C2D > Keqing EQE 5[N1C] EE 2[N1C] N1

“Hyper” Keqing. This team has numerous advantages over the old Keqing–Sara–Kazuha–Bennett: it gives Keqing reliable access to the Finale + Whimsy combo, handles multiwave better, has a second unit who deals respectable personal damage in Xiangling, and buffs Keqing’s personal damage far more than the old team given a C6 Chevreuse. Also, because Bennett is not on the team, it avoids the problem caused by his C6 Pyro Infusion.
Note that replacing Fischl with Sara tightens ER requirements for the entire team, making it an especially bad idea to play this team without C4+ Chevreuse.
Sample Rotation
(Keqing E)¹ > Chevreuse Q hE > Xiangling E > Sara E CA > Keqing Q EE² 5[N1C] > Chevreuse hE > Sara Q > Xiangling Q E > Sara E CA > Keqing EQE 5[N1C] E N1C³
¹First rotation only.
²EQE is also possible from second rotation onward.
³Physical N1C to detonate Stiletto for particles. Higher damage than EE.
Lunar-Charged
Artifact Stats
Sands | Goblet | Circlet |
| ATK% | Electro DMG Bonus > ATK%* | CRIT Rate** or CRIT DMG |
Stat Priority: CRIT > ATK% > EM
In Lunar-Charged teams, EM is a somewhat useful stat, especially if Keqing manages to take top LC contribution, but it is not competitive with ATK%.
*ATK% Goblets are typically far worse than Electro Goblets, but can become competitive or even outright better if Keqing has both a weapon with high Base ATK (such as Mistsplitter Reforged) and large amounts of DMG% (from sources such as her own C6, Furina’s Fanfare, a teammate holding 4pc Scroll of the Hero of Cinder City, and Mistsplitter Reforged).
**Be wary of using CRIT Rate Circlets if Keqing is running an artifact set that boosts CRIT Rate, as it is easy for her to overcap.
Artifact Sets
 4pc Marechaussee Hunter (MH) | 4pc MH is Keqing’s top option in Lunar-Charged by an exceedingly large margin when there is only one Nod-Krai unit on the team. Unfortunately, it requires Furina. |
4pc Night of the Sky’s Unveiling (NotSU) | A very powerful option that is roughly equal to traditional sets when there is only one Nod-Krai unit on the team and drastically better when there are two. Lunar-Charged Keqing should hopefully only ever be using either this or 4pc MH, depending on what artifact set is best in your specific team composition (NotSU with Aino, and MH with Furina). |
4pc Thundersoother | Electro aura uptime is essentially perfect in Lunar-Charged, making 4pc Thundersoother Keqing’s best traditional option. Falters slightly if Keqing has a high amount of DMG%. |
 2pc Mixed Sets (TF/ATK/MH) 4pc Thundering Fury 4pc Gilded Dreams | 2pc mixed set options generally fall slightly behind Thundersoother. 2pc MH is the weakest of the options here but is close enough to win out if the substats are exceptional. 4pc Thundering Fury and 4pc Gilded Dreams are competitive with mixed sets if Keqing is somehow the top LC contributor even without running a CRIT Rate artifact set, but if she is not, these sets are quite lacking. |
4pc Fragment of Harmonic Whimsy | The Whimsy + Finale of the Deep combo is still theoretically powerful in Lunar-Charged, but faces much stiffer competition than it does in Overload. 4pc MH in particular destroys Whimsy’s value, as it is the clear best option in many of the situations where Whimsy would otherwise shine (e.g. Keqing — Ineffa — Furina — Healer). Thus, while technically strong, it is difficult to find a situation in which Whimsy + Finale is practical and optimal, and in Lunar-Charged it is only slightly better than 4pc Thundersoother anyways. |
Weapons
5★ Mistsplitter Reforged | Thanks to its high Base ATK, CRIT DMG main stat, and powerful passive, Mistsplitter is generally Keqing’s best weapon across all archetypes. |
5★ Primordial Jade Cutter | Jade Cutter is a fairly polarizing weapon in Lunar-Charged. With traditional artifact sets, it is actually Keqing’s best weapon, overtaking Mistsplitter by a decent margin. However, it is heavily anti-synergistic with both of her optimal artifact sets for Lunar-Charged, 4pc Marechaussee Hunter and 4pc Night of the Sky’s Unveiling, as the combination of 4pc MH / NotSU, Jade Cutter, and Keqing’s A4 turns CRIT Rate into a dead substat. When this happens, Jade Cutter falls equal to or behind theoretically inferior weapons which can make much better use of CRIT Rate artifact sets, so it is never one of Keqing’s best options when she is running MH or NotSU. |
5★ Light of Foliar Incision | Foliar is another strangely polarizing option in Lunar-Charged that takes advantage of the fact that many of Keqing’s common teammates in Lunar-Charged buff her Elemental Mastery. When Keqing has exceptional amounts of EM, Foliar becomes one of her very best weapons, performing equal to Mistsplitter. If she does not, it reverts to being a generic 5-star stat stick with a fairly underwhelming passive. Note that 88.2% CRIT DMG weapons like Foliar are often technically Keqing’s best options for her personal damage, as Keqing is heavily likely to take top LC contribution when using them. However, this increase to Keqing’s damage simultaneously halves Ineffa’s LC reaction damage and is thus rather misleading, as it does not lead to better overall team damage. |
 5★ Summit Shaper | You would be forgiven for forgetting that this weapon exists, but it manages to be a top choice for Keqing in Lunar-Charged, as ATK% is a very valuable stat and Ineffa’s shield is extremely high uptime. Even so, certain rotations only have partial uptime on Ineffa’s shield. In those cases (or if the shield simply breaks), Summit Shaper admittedly loses a slight bit of value, but it remains a strong option. As Summit Shaper does not buff Lunar-Charged reaction damage in any way, it also falls behind 5-star CRIT stat sticks in scenarios where Keqing would take top LC contribution regardless of the weapon she is using (for instance, if she is paired with C6 Aino). |
 Other 5★ CRIT Stat Sticks | Absolution, Azurelight, Haran Geppaku Futsu, Uraku Misugiri, and Splendor of Tranquil Waters. 5-star stat sticks that perform solidly in Lunar-Charged, although they are never competitive with Mistsplitter. Weapons that offer CRIT DMG will be easier to use with 4pc MH and 4pc NotSU than weapons that offer CRIT Rate. Splendor is the worst of the bunch and should likely stay on Furina, if you’re using her. |
4★ Finale of the Deep | R5 Finale of the Deep is competitive with 5-star stat sticks if you have a healer that is clearing the Bond of Life for every Keqing combo. It loses some value if your rotation only allows your healer to clear BoL every other combo, and loses yet more if you don’t have a healer at all. |
5★ Freedom-Sworn | A weapon with passable personal damage for Keqing and a nice teamwide buff. Loses slight value if you’re only triggering the buff every other combo. |
4★ Lion’s Roar | Keqing’s trademark 4-star option, with full uptime on the passive all but guaranteed. |
 4★ Calamity of Eshu | Tied with R5 Lion’s Roar assuming full uptime on the passive. Similarly to Summit Shaper, it loses slight value if you lack full shield uptime. |
3★ Harbinger of Dawn | Although HoD is still not competitive with a high-refinement Lion’s Roar, it appreciates Ineffa greatly, as her shield makes it far more likely that you will enjoy full uptime on the weapon’s passive. Note that this is an especially terrible option to pair with Furina, as her HP drain is fairly likely to disable its passive, and even if it doesn’t, the CRIT Rate HoD offers pairs poorly with 4pc MH. |
 4★ The Black Sword, Wolf-Fang | Battle Pass options. Black Sword is generally equal to Lion’s Roar at equal refinements, while Wolf-Fang fares a bit worse, as Keqing’s damage distribution shifts away from her Elemental Skill outside of Dendro. Unfortunately, both BP options are CRIT Rate main stats and, as such, pair poorly with 4pc MH and NotSU. |
 4★ Moonweaver’s Dawn, Kagotsurube Isshin | Weak free options that should only be used if you have nothing better. Both weapons can currently only be obtained at R1, and it is uncertain if higher refinements on Moonweaver’s Dawn will be obtainable in the future — even if they are, they will only make the weapon very slightly better than R1 Lion’s Roar. |
Rotation Notation
- N = Normal Attack
- C = Charged Attack
- A = Aimed Shot
- P = Plunging Attack
- E = Elemental Skill
- tE = Tap Skill
- hE = Hold Skill
- Q = Elemental Burst
- D = dash (cancel)
- J = jump (cancel)
- W = walk (cancel)
- > = switch character
- ( ) = “these actions are optional; please refer to the notes below”
- [ ] = “repeat these actions the specified number of times”
Teams

Electro-Charged is traditionally known as a very flexible archetype where the reaction itself deals very little damage. In principle, Keqing could be paired with any strong Hydro or Electro units and the team would function. However, these compositions usually deal fairly low damage and are generally not recommended unless Keqing is fighting against specific enemy content that demands Electro-Charged.
However, the release of Ineffa and Lunar-Charged has transformed the archetype entirely, making it an incredibly strong option for Keqing. This streamlines the teambuilding, forming a strict core of Keqing and Ineffa, a Hydro with off-field application to enable LC, and a source of RES Shred, typically an Anemo for 4pc VV.
Note that Ineffa is usually dealing the highest damage on the team by a large margin, and Keqing faces extremely stiff competition for her slot in the archetype, not just from other Electro DPS units but also from Hydro characters like Neuvillette or possibly even strong off-fielders.
Notable Teammates
Ineffa | Ineffa quite literally makes Lunar-Charged possible through her Moonsign Benediction Passive, making her an essential character for the archetype. Although most of her value is in her off-field personal DPS, she still can benefit Keqing in several ways. Her Utility Passive brings a teamwide buff to Lunar-Charged damage, which Keqing can push even higher thanks to her high CRIT stats from her CRIT DMG Ascension and A4 Passive. Her C1 and Fractured Halo further buff the Lunar-Charged damage of all party members, which helps Keqing’s damage a great deal if she is the top LC contributor (which is entirely possible if Keqing is on a CRIT Rate artifact set and a CRIT DMG weapon). Defensively, her shield brings much-appreciated QoL to Keqing’s gameplay and unlocks certain weapon options such as Calamity of Eshu. |
Hydro
Strong Hydro units that provide off-field damage and application. Aino has the worst personal damage of the bunch but compensates by offering strong buffs both to Keqing and to Ineffa and by enabling Ascendant Gleam’s Lunar Reaction DMG% buff, as well as the full 4pc effects of Silken Moon’s Serenade and NotSU. Her C6 also makes it very likely that Keqing reaches top LC contribution.


Anemo (and Xilonen)
Anemo units contribute through 4pc VV and either offensive buffs or healing for Furina, if required. Xilonen obviously cannot hold 4pc VV but has potent healing on her Burst and contributes similar buffs to offensive Anemo supports through her RES Shred and 4pc Scroll.


Other Electro
If you must play Electro-Charged without Ineffa for whatever reason, these Electro units contribute a variety of strong off-field damage, sustain, or buffs. These are also the go-to units for if you want to play Triple Electro, which can be a strong choice against an enemy with mechanics that massively lower its own RES (such as the Battle-Hardened Pipilpan Idol) to the point that further RES Shred is significantly devalued.
Example Teams

A very safe team with very strong healing from Jean, and by extension, very high Fanfare generation. There are two distinct ways to approach rotating with this team:
Opting for a fairly long rotation — this sacrifices Keqing’s Fanfare uptime in favor of doing full combos with low team ER requirements; it leads to slightly higher damage at low investment and makes the team feel more forgiving in Energy-tight situations.
Shortening the rotation to as close to 20s as possible — this maximizes Fanfare uptime at the cost of higher team ER requirements and not being able to cast Keqing’s Burst every combo; it leads to maximum uptime on Ineffa’s shield and tends to scale better with vertical investment. For instance, Furina’s early Constellations increase the value of Fanfare and therefore make full Fanfare uptime extremely appealing.
Sample Longer Rotation (Low ER Requirements)
Ineffa E > Furina ED Q > Jean EQ > Keqing EQE 5[N1C] > Ineffa Q > Jean tE > Keqing EQE 5[N1C]¹ > Jean tE
Sample Shorter Rotation (Max Fanfare Uptime)
Ineffa EQ > Furina ED Q > Jean EQ > Keqing EQE 5[N1C] > Jean tE > Keqing EE 5[N1C]¹
¹You can cut this combo short by one or two Charged Attacks.

A very strong team that is excellent even without Constellations, but also has incredible potential given vertical investment. Xilonen condenses healing and offensive buffing into one slot, giving Keqing a safe team with a ton of DMG% buffs. Unfortunately, there is one minor point of anti-synergy: the high durability of Lunar-Charged aura and Ineffa’s permanent uptime on her Skill make it largely impossible for Xilonen to Scroll Hydro. (Still, it remains possible in some cases through use of “booking,” i.e. opening the Adventurer Handbook or another pause menu, to dodge global Crystallize ICD.)
Rotations for this team are extraordinarily nuanced but also quite forgiving, and the optimal sequence of actions will vary greatly depending on if you have certain Constellations (most obviously Xilonen C2 and Furina C6), the enemy mechanics, and your priorities (for instance, if you have pre-C2 Ineffa and feel unsafe without maximum uptime on her shield).
Sample Rotation
(Furina ED)¹ > Ineffa E > Xilonen EQ N2 > Furina Q > Keqing EQE 5[N1C] > Xilonen E N2 > Ineffa Q > Keqing EE 3[N1C]
Sample Rotation (Max Shield Uptime)
Ineffa (Q)² E > Furina ED Q > Xilonen EQ N2 > Keqing EQE 5[N1C] > Xilonen E N2
¹You can move this to when she Bursts on subsequent rotations.
²Whenever available.

One of the cheaper Lunar-Charged teams to build, with an exceedingly simple ~16s rotation enabled by Aino’s fast cooldowns and low Burst Energy Cost. Sucrose comes on-field at the end of the rotation to refresh Viridescent Venerer.
Ineffa often doesn’t have enough ER to Burst every rotation, and Sucrose’s 20s cooldown is too long for the rotation, so it is advised to use Ineffa and Sucrose’s Bursts on separate rotations for optimal gapfill.
Sample Rotation
Ineffa E (Q)¹ > Aino EQ > Sucrose ED (Q)¹ > Keqing EQE 5[N1C] > Sucrose N2
¹Every other rotation (alternate between Ineffa and Sucrose)

An option without Furina or Aino, which unfortunately does mean Keqing deals lower damage, but at least she manages to pick up a few buffs from Yelan and Kazuha. A slightly long rotation enables two Yelan Skill casts per rotation for lower ER requirements.
Sample Rotation
Ineffa E Q > Yelan Q N1 E N1 > Kazuha tEP N1 > Keqing E N1 Q E 5[N1C] > Yelan E N3 > Kazuha tEPQ
Sample Rotation (Yelan C1+)
Ineffa E Q > Yelan E Q N1 E N3 > Kazuha tEPQ N1 > Keqing E N1 Q E 5[N1C] > Kazuha tEP
Credits
dusted wind, Mystathi, haafr, azerad79, eliza, acerbus114, lostguide, nyteshadows
Team images made with the KQM portrait generator.